マナーモードでも音を出したい場合は、AudioSessionSetProperty() でカテゴリ指定をすると変更できる。
- (void)loadAudioMode:(BOOL)isLiveMode {
    AudioSessionInitialize(NULL, NULL, NULL, NULL);
    UInt32 sessionCategory;
    if (isLiveMode) {
        sessionCategory = kAudioSessionCategory_LiveAudio;
    } else {
        sessionCategory = kAudioSessionCategory_SoloAmbientSound;
    }
    AudioSessionSetProperty(kAudioSessionProperty_AudioCategory,
                            sizeof(sessionCategory),
                            &sessionCategory);
    AudioSessionSetActive(YES);
}
Audio Sessionカテゴリ
AudioSirvices クラスに定義してあり、iPhone Core Audio プログラミングの書籍に記載されているも定義が多いです(SDKのバージョンがあがったから?)。
enum { // typedef UInt32 AudioSessionPropertyID
    kAudioSessionProperty_PreferredHardwareSampleRate           = 'hwsr',   // Float64          (get/set)
    kAudioSessionProperty_PreferredHardwareIOBufferDuration     = 'iobd',   // Float32          (get/set)
    kAudioSessionProperty_AudioCategory                         = 'acat',   // UInt32           (get/set)
    kAudioSessionProperty_AudioRoute                            = 'rout',   // CFStringRef      (get only)
    kAudioSessionProperty_AudioRouteChange                      = 'roch',   // CFDictionaryRef  (property listener)
    kAudioSessionProperty_CurrentHardwareSampleRate             = 'chsr',   // Float64          (get only)
    kAudioSessionProperty_CurrentHardwareInputNumberChannels    = 'chic',   // UInt32           (get only)
    kAudioSessionProperty_CurrentHardwareOutputNumberChannels   = 'choc',   // UInt32           (get only)
    kAudioSessionProperty_CurrentHardwareOutputVolume           = 'chov',   // Float32          (get only/property listener)
    kAudioSessionProperty_CurrentHardwareInputLatency           = 'cilt',   // Float32          (get only)
    kAudioSessionProperty_CurrentHardwareOutputLatency          = 'colt',   // Float32          (get only)
    kAudioSessionProperty_CurrentHardwareIOBufferDuration       = 'chbd',   // Float32          (get only)
    kAudioSessionProperty_OtherAudioIsPlaying                   = 'othr',   // UInt32           (get only)
    kAudioSessionProperty_OverrideAudioRoute                    = 'ovrd',   // UInt32           (set only)
    kAudioSessionProperty_AudioInputAvailable                   = 'aiav',   // UInt32           (get only/property listener)
    kAudioSessionProperty_ServerDied                            = 'died',   // UInt32           (property listener)
    kAudioSessionProperty_OtherMixableAudioShouldDuck           = 'duck',   // UInt32           (get/set)
    kAudioSessionProperty_OverrideCategoryMixWithOthers         = 'cmix',   // UInt32           (get, some set)
    kAudioSessionProperty_OverrideCategoryDefaultToSpeaker      = 'cspk',   // UInt32           (get, some set)
    kAudioSessionProperty_OverrideCategoryEnableBluetoothInput  = 'cblu',   // UInt32           (get, some set)
    kAudioSessionProperty_InterruptionType                      = 'type',   // UInt32           (get only)
};
iPhoneの場合、@2x.png の画像を管理する事になるが、svnでは @ のファイル名はそのまま通らない。
ただ、ファイル名の末尾に「@」をつけてやるだけでとりあえずは回避できました。
svn add image@2x.png@ svn ci -m 'add image'
一括で追加する場合は、
svn status | grep '^?' | grep @2x | sed -e 's/.png/.png@/' | awk '{print $2}' | xargs svn add
作業コピーの状態とって・・・@2x 抽出して・・・ファイル名置換して・・・addして・・・ って、ちとこれはスクリプト化した方がいいですね。。。
参考ページ
iPhoneの画面サイズだとキーボードが邪魔して、UITextField の入力がスムーズにできなかったりします。
そこでキーボードの上部にViewを追加してやるのも良いかと。
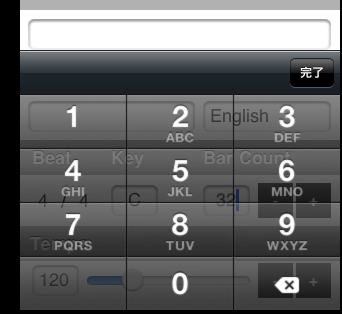
キーボード上部にViewを追加
UIToolBar あたりが良さそうなので IB で追加。
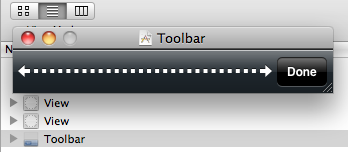 差し当たりキーボードを閉じる処理をするので、完了ボタンのIBAction で resignFirstResponder してやります。
@synthesize textField;
@synthesize textAccessoryView;

- (void)viewDidLoad {
    textField.inputAccessoryView = textAccessoryView;
    [super viewDidLoad];
}

- (IBAction)backgroundTap:(id)sender {
    [textField resignFirstResponder];
}
backgroundTap の sender は UIButton が送られるので、明示的に UITextField をresignFirstResponder にしました。
ただ、今回のサンプルは、どちらかと言うともうちょっと複雑な処理をさせたい向けかも知れません。 iPhone の電話は【発信】ボタンがあるのでキーボード自体を拡張する方法があるはず。 UITextField あたりをちょっと調べる価値ありですね。
Debian の crontab はデフォルトが nano になっている(?)。 てことで、vi に変更する。
.bashrc の変更
.bashrc に以下を追加して
export EDITOR=vi
.bashrc を再読み込み
source .bashrc
svnX でsvn管理していたのだが、「@x2」のファイルがコミットできなかったりする。 Xcode の SCM も勉強不足か??ちゃんとCommit されないファイルがあるので泣く泣くコマンドで。
新規プロジェクト
build/ や pbxuser などの不要ファイルは ignore してやる。
% svn add --force .
% svn revert "build" --recursive
% svn propset svn:ignore "build" .
% svn revert プロジェクト.xcodeproj/*.mode1v3
% svn revert プロジェクト.xcodeproj/*.pbxuser
% svn propedit svn:ignore プロジェクト.xcodeproj/
*.mode1v3
*.pbxuser
git に変更しようかな?と思うこのごろ。
UITabBar レイアウトで UIActionSheet を表示すると、下部のボタンが押せなくなる事がある。
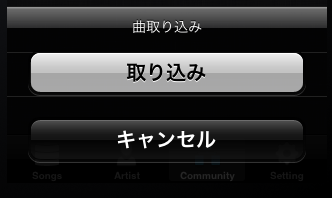 上記の画面の場合、【キャンセル】の下が押せなくなる。
showInView は window を渡す
UIActionSheet 表示処理で、showInView の UIView は self.view でなく self.view.window を渡してやる。
    UIActionSheet *actionSheet = [[UIActionSheet alloc] init];
    actionSheet.tag = 1;
    actionSheet.delegate = self;
    actionSheet.title = NSLocalizedString(@"ACTION_TITLE_IMPORT_SONG", nil);
    [actionSheet addButtonWithTitle:NSLocalizedString(@"ACTION_BUTTON_IMPORT_SONG", nil)];
    [actionSheet addButtonWithTitle:NSLocalizedString(@"BUTTON_CANCEL", nil)];
    actionSheet.cancelButtonIndex = 1;
    actionSheet.actionSheetStyle = UIBarStyleBlackTranslucent;
    [actionSheet showInView:super.view.window];
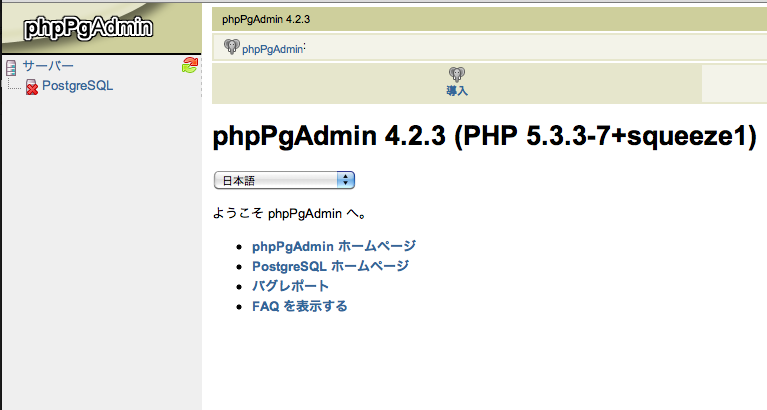
aptitude install phppgadmin
プログラムソースは /user/share/phppgadmin/ にインストールされます。
また、設定ファイルは
/etc/apache2/conf.d/phppgadmin -> ../../phppgadmin/apache.conf
にシンボリックリンクが張られているので、自分の環境にあったアクセス許可を設定する。
ローカル環境なので全てのホストにアクセス権を許可。
#allow from 127.0.0.0/255.0.0.0 ::1/128 allow from all
iOS4.3 にしてから カスタムセルを利用した UITableView の描画処理でクラッシュしてしまった。 以前のカスタムセルの処理(セルの再利用)がまずかったようだ。
UITableViewCell の拡張ファイル作成
#import

@interface SongListCell : UITableViewCell {
    UILabel *songNameField;
    UILabel *artistNameField;
}

@property(nonatomic ,retain) IBOutlet UILabel *songNameField;
@property(nonatomic ,retain) IBOutlet UILabel *artistNameField;

@end
UIViewController の拡張ファイル作成
#import
#import "SongListCell.h"

@interface SongListCellController : UIViewController {
    SongListCell *cell;
}

@property(nonatomic ,retain) IBOutlet SongListCell *cell;

@end
カスタムセル用の xibファイル作成
カスタムセル用の xibファイル作成して、UITableViewCell と UIView を配置する。
・File's Owner:SongListCellController ・UITableViewCell :SongListCell
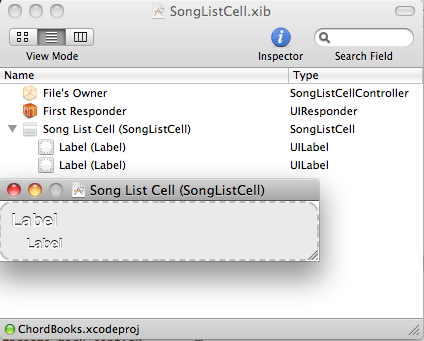
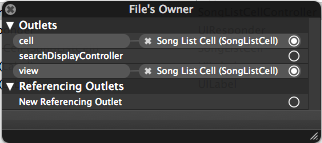
ここでポイントは、File's Owner の view と cell を UITableViewCell にバインドします。
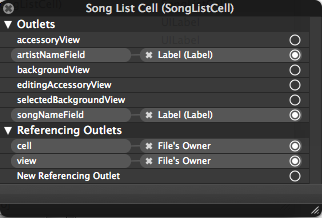
あとは、UILabelなどに表示したいデータフィールドをバインドします。
UITableView での表示
- (UITableViewCell *)tableView:(UITableView *)tableView cellForRowAtIndexPath:(NSIndexPath *)indexPath {
    static NSString *identifier = @"SongListCell";
    SongListCell *cell = (SongListCell *)[tableView dequeueReusableCellWithIdentifier:identifier];
    if (cell == nil) {
        SongListCellController *controller = [[SongListCellController alloc] initWithNibName:identifier bundle:nil];
        cell = (SongListCell *)controller.view;
        [controller release];
    }
    [self configureCell:cell atIndexPath:indexPath];

    return cell;
}
カスタムセルコントローラー ListCellController をxib で initWithNibName する。 コントローラの view を カスタムセルクラスに受け渡します。 この時 ListCellController は release します。
Xcode 4を使ってみたが、落ちたり固まったりする頻度が多い。 機能的には良くなったと思うので惜しい。
って事で、Xcode関連のアンインストール方法。
sudo /Developer/Library/uninstall-devtools --mode=all
※Xcode を /Developer にインストールしている場合
コマンド終了後、Macを再起動してやれば削除される。


