会社のPCもIE7にしてみたけど、
IE7自体もCSS3全然対応できてないじゃんw
IE8でもHTML5だめみたいだし、こりゃブラウザ統一するの無理じゃね?
とりあえず、Windowsは以下のブラウザで確認 ・FireFox3.6.6 ・Safari5.0 ・Opera10.60
マルチファイルアップロードはOperaだめだね。
つうわけで、このサイトの現状はWebKitとMozilaのみ対応ぽい(ひとごとw)

このサイトの管理者画面でRitchTextエディタを使おうと、どれがよさげか調べてみる。
その中で、TinyMCEってのが高機能そう。 Wordpressでも採用されてるんだね。 つっても、Wordpressを使うのはちとあれなので、とりあえずサンプルを作ってみる。
Query版をつかってみた。
HTMLヘッダー
スクリプト実行
$().ready(function() {
          $('textarea.tinymce').tinymce({
            script_url : '../javascripts/tiny_mce/tiny_mce.js'',

            theme : "advanced",
            plugins : "pagebreak,style,layer,table,save,advhr,advimage,advlink,emotions,iespell,inlinepopups,insertdatetime,preview,media,searchreplace,print,contextmenu,paste,directionality,fullscreen,noneditable,visualchars,nonbreaking,xhtmlxtras,template,advlist",
            theme_advanced_buttons1 : "save,newdocument,|,bold,italic,underline,strikethrough,|,justifyleft,justifycenter,justifyright,justifyfull,styleselect,formatselect,fontselect,fontsizeselect",
            theme_advanced_buttons2 : "cut,copy,paste,pastetext,pasteword,|,search,replace,|,bullist,numlist,|,outdent,indent,blockquote,|,undo,redo,|,link,unlink,anchor,image,cleanup,help,code,|,insertdate,inserttime,preview,|,forecolor,backcolor",
            theme_advanced_buttons3 : "tablecontrols,|,hr,removeformat,visualaid,|,sub,sup,|,charmap,emotions,iespell,media,advhr,|,print,|,ltr,rtl,|,fullscreen",
            theme_advanced_buttons4 : "insertlayer,moveforward,movebackward,absolute,|,styleprops,|,cite,abbr,acronym,del,ins,attribs,|,visualchars,nonbreaking,template,pagebreak",
            theme_advanced_toolbar_location : "top",
            theme_advanced_toolbar_align : "left",
            theme_advanced_statusbar_location : "bottom",
            theme_advanced_resizing : true,
            content_css : "css/content.css",
          });
      });
HTML側

やっとDelegateについてわかってきた。 自分のクラスを他のクラスに受け渡す際、新たにクラスのインスタンスを作成しなくてくてもできる!ってことかも。 以下のように、複数のViewControllerを管理用のViewControllerを経由して切り替えてみる。
YosouViewController(管理用) LoginViewController(表示用) TopViewController(表示用) ・LoginViewControllerでログインボタンがクリックされたら、TopViewControllerに切り替える。 ・ページ切替の処理は、子のViewControllerからYosouViewControllerDelegateを経由してYosouViewControllerに委任する。
YosouViewController.h
@protocol YosouViewControllerDelegate;

@class LoginViewController;
@class TopViewController;

@interface YosouViewController : UIViewController {
    id <YosouViewControllerDelegate> delegate;
    LoginViewController *loginViewController;
    TopViewController *topViewController;
}

@property (nonatomic, assign) id <YosouViewControllerDelegate> delegate;
@property (nonatomic, retain) IBOutlet LoginViewController *loginViewController;
@property (nonatomic, retain) IBOutlet TopViewController *topViewController;

-(void) page:(UIView *)view;

@end

@protocol YosouViewControllerDelegate
@optional
-(void) pageLogin;
-(void) pageTop;
@end
まず参照されるクラスでDelegateを定義する。
Delegateメソッドの定義で、@optionalにしておかないとDelegateを設定したクラスで警告がでる
YosouViewController.m
#import "YosouViewController.h"
#import "LoginViewController.h"
#import "TopViewController.h"

@implementation YosouViewController

@synthesize delegate;
@synthesize loginViewController;
@synthesize topViewController;

...

- (void)viewDidLoad {
    delegate = (id)self;

    [delegate pageLogin];
    [super viewDidLoad];
}

...

#pragma mark -
#pragma mark Custom Methods
-(void) page:(UIView *)view {
    NSLog(@"page");
    for (UIView *subView in self.view.subviews) {
        [subView removeFromSuperview];
    }
    [self.view addSubview:view];
    [UIView beginAnimations:nil context:NULL];
    [UIView setAnimationDuration:0.75];
    [UIView setAnimationTransition:UIViewAnimationTransitionFlipFromLeft forView:self.view cache:YES];
    [UIView commitAnimations];
}

#pragma mark -
#pragma mark Delegate Methods
-(void) pageLogin {
    NSLog(@"pageLogin");
    if (loginViewController == nil) {
        loginViewController = [[LoginViewController alloc]
                           initWithNibName:@"LoginViewController"
                           bundle:nil];
        loginViewController.delegate = self;
    }
    [self page:loginViewController.view];
}
-(void) pageTop {
    NSLog(@"pageTop");
    if (topViewController == nil) {
        topViewController = [[TopViewController alloc]
                         initWithNibName:@"TopViewController"
                         bundle:nil];
        topViewController.delegate = self;
    }
    [self page:topViewController.view];
}
viewDidLoadで、自分自身のDelegateを自分のクラス(親)を受け渡す。
ページ切替のメソッドpageLogin、pageTopでそれぞれのViewControllerを作成し、Delegateに親クラスを受け渡す。
LoginViewController.h
#import "YosouViewController.h"

@interface LoginViewController : UIViewController<YosouViewControllerDelegate> {
    id <YosouViewControllerDelegate> delegate;
}

@property (nonatomic, assign) id delegate;
-(IBAction) loginPressed:(id)sender;
YosouViewControllerDelegateを継承(っていうのか?)して、YosouViewControllerDelegateを定義する。 loginPressedはログインボタンクリックのメソッド。
LoginViewController.m
#import "LoginViewController.h"
#import "YosouViewController.h"

@implementation LoginViewController
@synthesize delegate;

....

#pragma mark -
#pragma mark IBAction Methods
-(IBAction) loginPressed:(id)sender {
    NSLog(@"LoginViewController loginPressed");
    [delegate pageTop];
}
YosouViewControllerDelegateでDelegateされているので、delegateプロパティを経由してpageTopにアクセスできる。
まとめ
つうわけで、自分なりにまとめ。 Delegateを利用すれば、クラス間のアクセスはインスタンスを無駄に作成せずアクセスできる。
結局はシングルトンでクラスインスタンスを受け渡しているのと同じことをしてる(?)と思うが、 Delegateと明示した方がわかりやすいすね。 またextends(継承)する方法もあるが、これは上下関係が必須となってしまう。 Delegateは、上下関係なく縦横無尽にクラスにアクセスできるのが良い点。
iPhoneのViewの切り替えは、まだまだ日が浅いせいか色々頭を悩ませる部分。
UINavigationControllerのような階層的な切り替えでなく、多様なレイアウトが混在するような画面繊維、 例えばUITabBarControllerとUIViewControllerが独立して存在し、これらをある条件によって切替える場合。
例えば、iPhoneアプリ入門(Viewの変更)の方法のようにaddSubview:newViewやremoveFromSuperviewで 親viewに子のviewを追加、削除しています。
ただこのサンプルでは、viewが増えるごとにif文で条件分岐しなきゃいけない感じ(?)なので修正してみる。
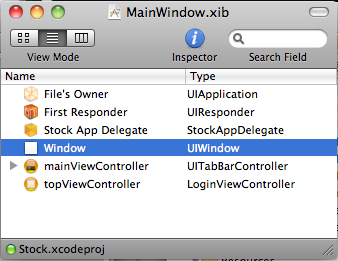
InterfaceBuilderでTabBarApplicationをバインド
(1) UITabBarControllerを利用するので、プロジェクトはTabBarApplicationを選択する。 ※その他UINavigationController等を利用する場合は、手動でDelegate等の追加が必要
(2) 第一階層の画面は以下の2つを利用する
・トップ画面(ログイン前の画面群):(UIViewController) topViewController ・メイン画面(ログイン後の画面群):(TabBarController) mainViewController
topViewControllerは、ViewControllerで.h、.m、.xibを作成する。 ※サンプルではLoginViewControllerの名称で作成 mainViewControllerは、タブで表示する数だけViewControllerの.h、.m、.xibを作成する。
(3) アプリケーションデリゲート.hを修正する。 StockAppDelegate.h
@interface StockAppDelegate : NSObject <UIApplicationDelegate, UITabBarControllerDelegate> {
    UIWindow *window;
    UITabBarController *mainViewController;
    UIViewController *topViewController;
}

@property (nonatomic, retain) IBOutlet UIWindow *window;
@property (nonatomic, retain) IBOutlet UITabBarController *mainViewController;
@property (nonatomic, retain) IBOutlet UIViewController *topViewController;

-(void) showMainView;
-(void) showTopView;
-(void) showView:(UIView *)view;
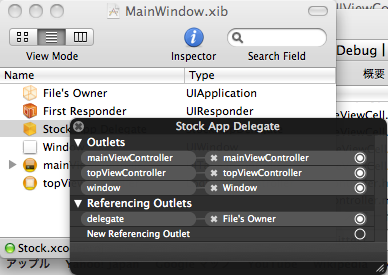
(4) UIViewController、TabBarControllerを追加し、アウトレットを設定する。
 ※UIViewControllerは、NibにLoginViewControllerを指定している
(5) TabBarControllerに表示したいViewControllerを追加する。

(6) AppDelegateでUIViewController、TabBarControllerのdelgateを設定する。
View切替の実装
次にStockAppDelegate.mを修正
(1) mainViewController、topViewControllerを@synthesizeする。
@synthesize window;
@synthesize mainViewController;
@synthesize topViewController;
(2) showViewの実装
-(void) showView:(UIView *)view {
    for (UIView *subView in window.subviews) {
        [subView removeFromSuperview];
    }
    [window addSubview:view];
    [window makeKeyAndVisible];
    [UIView beginAnimations:nil context:NULL];
    [UIView setAnimationDuration:0.75];
    [UIView setAnimationTransition:UIViewAnimationTransitionFlipFromLeft forView:self.window cache:YES];
    [UIView commitAnimations];
}
windowに追加されたsubviewsがあれば全て削除し、指定したviewを追加する。 adddSubviewの他に、insertSubview、bringSubview、sendSubview、eschangeSubviewAtIndexがあるので、 削除する方式ではなく、これらを利用しても良いかも知れない。 ※参考:福井高専IT研究所 UIView
切り替えアニメーションは、viewではなくアプリケーションのメインビュー(window)で実現している。
(3) showTopView、showMainViewの実装
-(void) showTopView {
  [self showView:topViewController.view];
}
-(void) showMainView {
  [self showView:mainViewController.view];
}
showViewで、表示したいviewを引数として実行している。
(4) didFinishLaunchingWithOptionsの実装
- (BOOL)application:(UIApplication *)application didFinishLaunchingWithOptions:(NSDictionary *)launchOptions {
    [self showTopView];
    return YES;
}
アプリケーション起動時に、topViewController.viewを表示するようにする。
----2010/09/01追記 didFinishLaunchingWithOptionsに記述するのはあまりよろしくない処理と思います。 View遷移を管理するクラスを作った方がよさげです。
(5) LoginViewControllerで、ビュー切替えの処理を実装する。
LoginViewController.xib
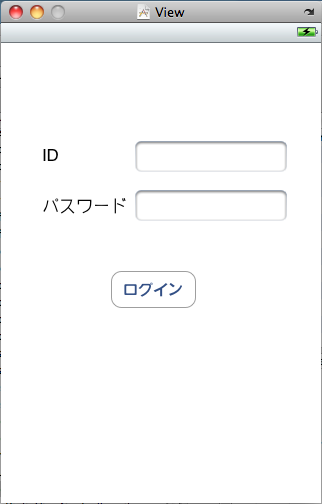 ※ログインボタンをクリックしたらmainViewController.viewを表示する。
LoginViewController.m
-(IBAction) changeView:(id)sender {
    if (TRUE) {
        StockAppDelegate *delegate = (StockAppDelegate*)[[UIApplication sharedApplication] delegate];
        [delegate showMainView];
    }
}
ただ、これだとDelegateの意味がないか・・・。 普通に、UIApplication showMainViewでいいもんね。 そもそもUIApplicationにメソッド書いてる時点で駄目っすね。
----2010/09/01追記 LoginViewControllerにdelegateを定義し、showMainView:の定義されているクラスでLoginViewControllerにdelegateを受け渡してやるのが正しいか?
例
View切替をするカスタムクラス
- (void)viewDidLoad {
    loginViewController.delegate = self;
}

- (void)showMainView {
    ....
}
@protocol LoginViewControllerDelegate;

@interface LoginViewController : UIViewController {
    id  delegate;
}

@property (nonatomic, assign) id <LoginViewControllerDelegate> delegate;

@end

@protocol LoginViewControllerDelegate
-(void)showMainView;
@end
これで、LoginViewController上でdelegateを経由してshowMainView:を実行できる。
delegate云々もそうですが、UIViewController、UITabNavigationController、UITabBarControllerが複雑に入り組んだアプリを作成する場合、どんな画面設計にするか?の方が重要ですね(^_^;)
カスタムクラスにdelegateを実装してみる。
.hファイル
@protocol LoginViewControllerDelegate;

@interface LoginViewController : UIViewController {
    id  delegate;
}

@property (nonatomic, assign) id <LoginViewControllerDelegate> delegate;

-(IBAction) changeView:(id)sender;

@end

@protocol LoginViewControllerDelegate
-(void) logout;
@end
・デリゲートのプロトコル
@protocol デリゲート名;
・デリゲートのインターフェイス
id <デリゲート名> delegate;
・デリゲートのgetter、setter
@property(nonatomic, assign) id <デリゲート名> delegate
assignしてsetterで単純代入している。 retainにしないのは、循環参照になりオブジェクトが解放されずメモリリークになるかららしい。 ※参考:delegate オブジェクトは retain すべきではない
・デリゲートメソッド、プロパティの宣言
@protocol デリゲート名 ... @end
うーん、C言語をほとんど通ってないオイラはCの構造体
struct
を知らなかったw
スクリプト系言語の構造体は、Object型で片付けてあまり意識しないですよね。 PHPだと「stdClass」、ActionScriptだとまんま「Object」すね。
あと、C独自なものが結構あったりする。
整数型の符号宣言子である
signe/unsigned
これはJavaにもないですよね。 unsignedとは何ですか?
うーん、ついにと言うか、、、テストケースを勉強しなきゃいけなくなった。 えらい面倒くさいけど、知ってて損はない知識だからなぁ・・・
という事で、情報収集から
参考リンク
・スマートフォン(iPhone,Android) 開発技術Wiki UnitTest ・iPhoneと単体テスト環境構築メモ ・iPhone + UnitTest ・XCode でユニットテストするときのはまりポイント ・Xcode 2.1 と Unit Test ・[iUnitTest]非同期テストがすっきりしました ・OCUnitの使い方(Static Library編)
さすがに、英語ドキュメントは萎える・・・ Test Driving Your Code with OCUnit
NSCoder、NSZone、NSKeyedArchiverを使って、データの保存をしてみます。
まず、IBで適当にフィールドを用意し、アウトレットも接続しておきます。
サンプル
#define kFileName @"archive"
#define kDataKey @"Data"

@interface PersistenceViewController : UIViewController {
    UITextField *firstNameField;
    UITextField *lastNameField;
    UITextField *passwordField;
}

@property (nonatomic, retain) IBOutlet UITextField *firstNameField;
@property (nonatomic, retain) IBOutlet UITextField *lastNameField;
@property (nonatomic, retain) IBOutlet UITextField *passwordField;

-(NSString *)dataFilePath;
-(void)applicationWillTerminate:(NSNotification *)notification;
kFileNameは保存ファイル名、kDataKeyはデータ保存のキーです。
カスタムメソッドとして、データ保存ファイルのパス取得「dataFilePath」と、 NSNotification(監視)を利用してデータ保存をするメソッドを定義し、.mファイルに実装します。
-(NSString *)dataFilePath {
    NSArray *paths = NSSearchPathForDirectoriesInDomains(
                                                         NSDocumentDirectory,
                                                         NSUserDomainMask,
                                                          YES);
    NSString *documentsDirectory = [paths objectAtIndex:0];
    return [documentsDirectory stringByAppendingFormat:@"/%@", kFileName];
}
-(void)applicationWillTerminate:(NSNotification *)notification {
    Users *users = [[Users alloc] init];
    users.firstName = firstNameField.text;
    users.lastName = lastNameField.text;
    users.password = passwordField.text;

    NSMutableData *data = [[NSMutableData alloc] init];
    NSKeyedArchiver *archiver = [[NSKeyedArchiver alloc]
                                 initForWritingWithMutableData:data];
    [archiver encodeObject:users forKey:kDataKey];
    [archiver finishEncoding];
    [data writeToFile:[self dataFilePath] atomically:YES];
    [users release];
    [archiver release];
    [data release];
}
参考本を見てやってたのですが、どうやらstringByAppendingFormatでパスを作る時に、「/」をつけておかないと絶対パスが生成できませんでした。 ただし、シミュレータレベルなので実機の挙動はわかりません。。。
ただ、ログを見る限り「Documentsarchive」となってしまっていたので、多分「/」をつけないとダメだと思います。
次に、データのモデル的なクラスを作ります。
#define kFirstName @"firstName"
#define kLastName @"lastName"
#define kPassword @"password"

@interface Users : NSObject<NSCoding, NSCopying> {
    NSString *firstName;
    NSString *lastName;
    NSString *password;
}

@property (nonatomic, retain) NSString *firstName;
@property (nonatomic, retain) NSString *lastName;
@property (nonatomic, retain) NSString *password;
ファイルの読み書きはNSCoding、NSCopyingを利用するので拡張しておきます。
@interface Users : NSObject<NSCoding, NSCopying>
実装は以下の通り
@implementation Users
@synthesize firstName;
@synthesize lastName;
@synthesize password;

- (void)encodeWithCoder:(NSCoder *)encoder {
    [encoder encodeObject:firstName forKey:kFirstName];
    [encoder encodeObject:lastName forKey:kLastName];
    [encoder encodeObject:password forKey:kPassword];
}
- (id)initWithCoder:(NSCoder *)decoder {
    if (self = [super init]) {
        self.firstName = [decoder decodeObjectForKey:kFirstName];
        self.lastName = [decoder decodeObjectForKey:kLastName];
        self.password = [decoder decodeObjectForKey:kPassword];
    }
    return self;
}
- (id)copyWithZone:(NSZone *)zone {
    NSLog(@"copyWithZone");
    Users *copy = [[[self class] allocWithZone:zone] init];
    copy.firstName = [[self.firstName copyWithZone:zone] autorelease];
    copy.lastName = [[self.lastName copyWithZone:zone] autorelease];
    copy.password = [[self.password copyWithZone:zone] autorelease];
    return copy;
}
initWithCoder、encodeWithCoder、encodeWithCoderは必ず実装が必要なプロトコルです。 initWithCoderで読み込み、encodeWithCoderで書き込みです。 copyWithZoneは、現在のデータをコピーしておくことで、データ保存処理を円滑にしてくれます。 autoreleaseを設定しておく事で、自動的にメモり解放してくれます。
しかし、全部覚えなくてもコードヒントで入力できるので便利ですね(^^;)
最後に、viewDidLoadによるデータ読み込みとデータ書き込みの監視を実装します。
- (void)viewDidLoad {
    NSString *filePath = [self dataFilePath];
    if ([[NSFileManager defaultManager] fileExistsAtPath:filePath]) {
        NSData *data = [[NSMutableData alloc]
                        initWithContentsOfFile:[self dataFilePath]];
        NSKeyedUnarchiver *unarchiver = [[NSKeyedUnarchiver alloc]
                                       initForReadingWithData:data];
        Users *users = [unarchiver decodeObjectForKey:kDataKey];
        [unarchiver finishDecoding];

        firstNameField.text = users.firstName;
        lastNameField.text = users.lastName;
        passwordField.text = users.password;

        [unarchiver release];
        [data release];
    }

    UIApplication *app = [UIApplication sharedApplication];
    [[NSNotificationCenter defaultCenter] addObserver:self
                                        selector:@selector(applicationWillTerminate:)
                                        name:UIApplicationWillTerminateNotification
                                        object:app];
    [super viewDidLoad];
}
まずはファイルの読み込み ファイルの有無は[[NSFileManager defaultManager] fileExistsAtPath]で判断。 ファイルがあれば、[NSMutableData initWithContentsOfFile:]で指定のファイルパスからデータ(NSData)を取得します。
[NSKeyedUnarchiver initForReadingWithData]でNSDataをNSKeyedUnarchiverに変換し、 [NSKeyedUnarchiver decodeObjectForKey:]でデコードします。 キャストしなくてもUsers型でデータをバインドできるのが素晴らしい。
次にファイルの書き込みの監視登録です。 [UIApplication sharedApplication]でアプリケーションを取得できます。 NSNotificationCenterでUIApplicationのメソッドが発生した時にイベントを発生させます。
この例では、[UIApplication UIApplicationWillTerminateNotification]が発生したときに、applicationWillTerminateを実行します。 addObserverに自分自身、objectに監視対象のUIApplication、@selectorは発生後のメソッドです。
ここら辺りになってくると、UIApplicationの遷移を理解しておかないと思わぬ挙動になりそうなので注意ですね(^^;)
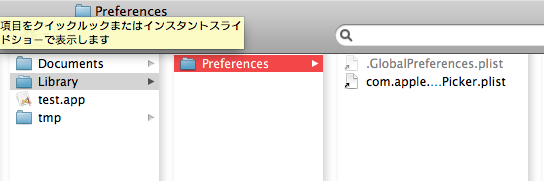
アプリケーションのデータ保存は、Documentsフォルダで管理される。
シミュレータ上のパスは、
Applications
/Users/ユーザ名/Library/Application Support/iPhone Simulator/User/Applications
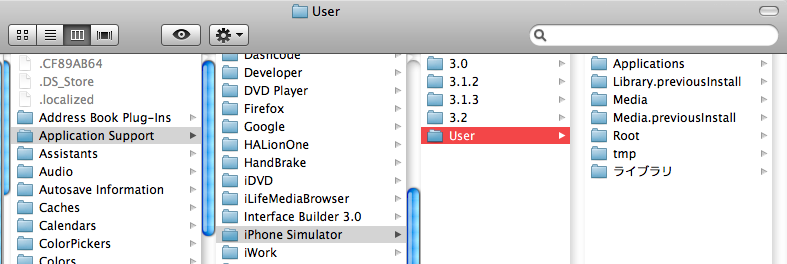
Documents
/Users/ユーザ名/Library/Application Support/iPhone Simulator/User/Applications/アプリコード/Documents
/Users/ユーザ名/Library/Application Support/iPhone Simulator/iOSバージョン/Applications/アプリコード/Documents
サンプルコード
実際にDocumentsにファイルを読み書きするには、
    NSArray *paths = NSSearchPathForDirectoriesInDomains(NSDocumentDirectory, NSUserDomainMask, YES);
    NSString *documentDirectory = [paths objectAtIndex:0];
    NSString *file = [documentDirectory
                          stringByAppendingFormat:@"loadfile.txt"];
NSSearchPathForDirectoriesInDomainsでディレクトリを指定します。 第一引数はNSPathUtilities.hで定義されたパスを指定
・NSDocumentDirectory:Documents ・NSApplicationDirectory:アプリケーション ・NSDesktopDirectory:デスクトップ ・NSLibraryDirectory:ライブラリ
第二引数は、どこほフォルダを探すのか指定する定数
・NSSystemDomainMask:システム ・NSUserDomainMask:ユーザホーム
例ではDocumentsディレクトリを取得したが、NSArrayで返される。 Documentsはアプリに1つしかないため、NSArrayの最初のデータを取得すれば良い。
NSString stringByAppendingFormatでファイル名を指定し、フルパスとなる。