2010/6末にxcode_3.2.3_and_iphone_sdk_4__final.dmg がリリースされました。
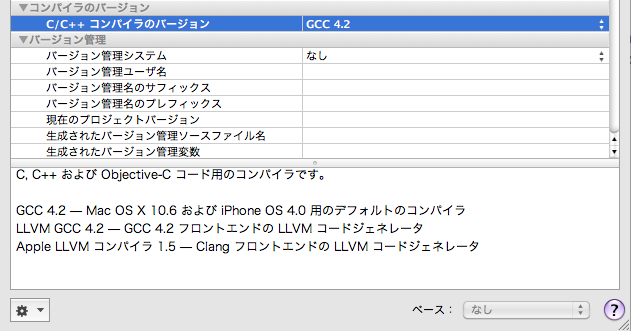
Xcode3.2.3 + iPhone SDK4のコンパイラはデフォルトでGCC 4.2(C/C++)のようです C言語を通ってないオイラには、内部的なことは無知です(^^;) XcodeのバージョンによってGCCのコンパイラが異なります。
参考リンク
・Xcode の GCC バージョンとビルド番号 ・Apple Developer GCCコンパイラ Xcode 3.1から、gcc4.2.1が採用されているようです。
ちなみに会社のiMacのgccを確認
将来的にはLLVMコンパイラってのがデフォルトになるみたいですが、LLVMって何ぞや?
Snow LeopardのXcodeには、オープンソースのLLVM.orgプロジェクトに基づく2つの新しいコンパイラが 含まれています。 まったく新しい LLVMコンパイラと、完全な下位互換性を持ったLLVM GCCコンパイラです。 両方とも、新しい革新的な技術の採用により、ビルド時間とコード生成速度が改善されています。 実際、新しいLLVMコンパイラでは、より効率的で、より高速に動作するコードを生成しながら、 ココア・プロジェクトのビルドは2倍速くなっています。
うーん、よくわからんが、LLVMはまだ使わない方がいいとの声があるようです。
また、SDK 3.2になるとiPhoneデバイス3.1.3が利用できなくなっみたいです。 iOS 4/iPhone SDK 4正式公開
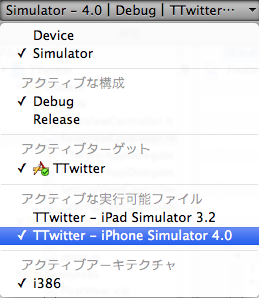
Xcodeシミュレータ選択
iPad(3.2)、iPhone(4.0)のみ。
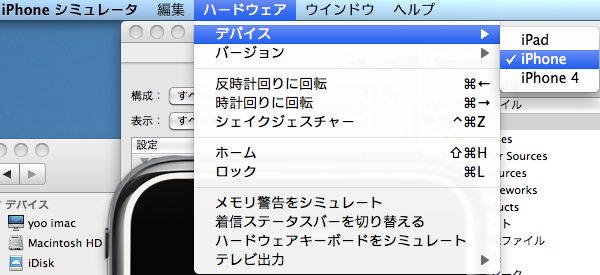
シミュレータデバイス
iPad、iPhone、iPhone4の3種類
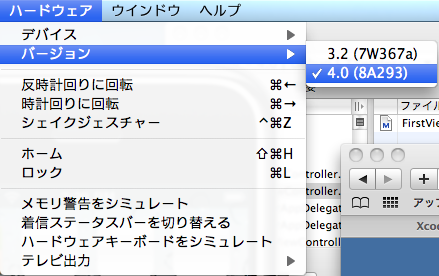
シミュレータOSバージョン
3.2と4.0しか選択肢がありません。
 つまりは、iPad(3.2)、iPhone(4.0)でしかシミュレートできません。
※iPhone3.2はないので
つまりは、iPad(3.2)、iPhone(4.0)でしかシミュレートできません。
※iPhone3.2はないので
実際に、/Developer/Platforms/iPhoneSimulator.platform/Developer/SDKsには以下の2種類
・iPhoneSimulator3.2.sdk
・iPhoneSimulator4.0.sdk
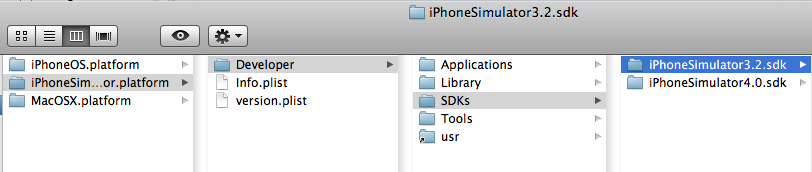
うーん、iPhoneSimulator3.1.sdkってのを手動でインストールすればいいのかな? て、ソースはどこにあるの? SDK4しかダウンロードできないんだけど・・・

iPhoneの回転を検知する方法は2つ
(1) shouldAutorotateToInterfaceOrientationを利用 http://iphone.longearth.net/2009/04/07/%E3%80%90uiviewcontroller%E3%80%91iphone%E3%82%92%E6%A8%AA%E5%90%91%E3%81%8D%E3%81%AB%E3%81%97%E3%81%9F%E6%99%82%E3%81%AB%E5%88%A5%E7%94%BB%E9%9D%A2%E3%82%92%E8%A1%A8%E7%A4%BA%E3%81%99%E3%82%8B/
(2) 回転時のNotificationを捕まえる iPhoneの回転をshouldAutorotateToInterfaceOrientation: 以外の方法で検知する。
うーん、どっちがいいのだろうか?
■参考サイト [iPhone] JSON Framework の使い方(準備編)
■json-frameworkのダウンロード Google Code json-framework
■実装例 このライブラリの利用法は一応3つのやり方があるが、一番手っ取り早くプロジェクトにソースコピーで利用してみる。
(1) プロジェクトを作成する
(2) ClassesにダウンロードしたJSONフォルダをコピーする。
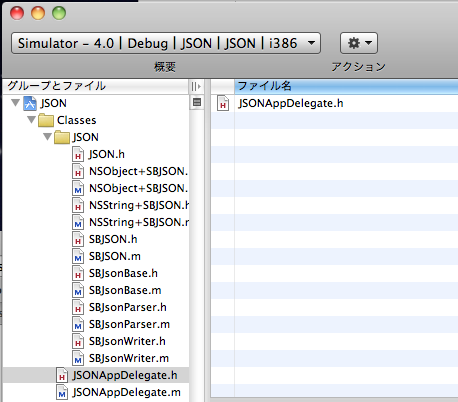
(3) JSON.hをimportする。
#import "JSON/JSON.h"
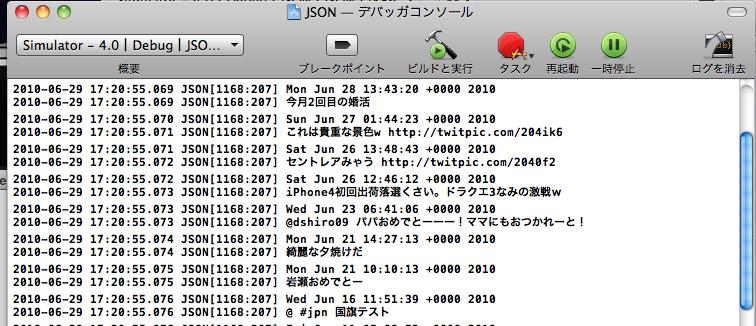
■オレのつぶやきをログに表示
- (BOOL)application:(UIApplication *)application
    didFinishLaunchingWithOptions:(NSDictionary *)launchOptions {

    NSString *urlString = @"http://twitter.com/statuses/user_timeline/yoo_yoo_yoo.json";
    NSURL *url = [NSURL URLWithString:urlString];
    NSString *jsonString = [NSString stringWithContentsOfURL:url
                                           encoding:NSUTF8StringEncoding
                                           error:nil];
    NSArray *jsonArray = [jsonString JSONValue];
    for (NSDictionary *dic in jsonArray) {
        NSLog([dic objectForKey:@"text"]);
        NSLog([dic objectForKey:@"created_at"]);
    }
    [window makeKeyAndVisible];
    return YES;
}
(1) NSURL URLWithStringでNSURLを生成 (2) NSString stringWithContentsOfURLで指定したパスとエンコーディングで文字列(JSON)を取得 これは便利!だが、URLRequestで取得するのが一般的かもしれない。 (3) NSString JSONValueで文字列(JSON)をNSArrayに変換 (4) JSONのデータ構造にあわせて表示 Twitterの場合は、第一階層のデータはNSDictionaryとして返される。
結局のところNSStringを拡張している訳ですね!
■UITableViewで表示
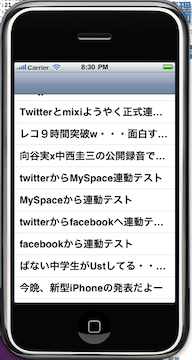 これ、ちとハマりました。
Navigation-based Applicationでプロジェクトを作成。
-RootViewController.h
これ、ちとハマりました。
Navigation-based Applicationでプロジェクトを作成。
-RootViewController.h
#import <UIKit/UIKit.h>
#import "JSON/JSON.h"

@interface RootViewController : UITableViewController {
    NSArray *twitterJson;
    UITableView *twitterTableView;
}

@property (nonatomic, retain) NSArray *twitterJson;
@property (nonatomic, retain) IBOutlet UITableView *twitterTableView;
@end
-RootViewController.mの一部抜粋
- (void)viewDidLoad {
    NSString *urlString = @"http://twitter.com/statuses/user_timeline/yoo_yoo_yoo.json";
    NSURL *url = [NSURL URLWithString:urlString];
    NSString *jsonString = [NSString stringWithContentsOfURL:url
                                                    encoding:NSUTF8StringEncoding
                                                       error:nil];

    twitterJson = [[jsonString JSONValue] retain];
    [jsonString release];
    [super viewDidLoad];
}

- (UITableViewCell *)tableView:(UITableView *)tableView
                cellForRowAtIndexPath:(NSIndexPath *)indexPath {

    static NSString *CellIdentifier = @"Cell";

    UITableViewCell *cell = [tableView
                dequeueReusableCellWithIdentifier:CellIdentifier];

    NSUInteger row = [indexPath row];
    if (cell == nil) {
        cell = [[[UITableViewCell alloc]
                initWithStyle:UITableViewCellStyleDefault
                reuseIdentifier:CellIdentifier]
                autorelease];
    }

    NSDictionary *rowValues = [self.twitterJson objectAtIndex:row];
    cell.textLabel.text = [rowValues objectForKey:@"text"];
    return cell;
}
最初は読み込まれるものも、スクロールするとランタイムエラーで終了してしまう・・・。 色々調べたら、viewDidLoadでJSON→NSArray変換処理の際、自動的にメモリ解放されていたのが原因のようした。 以下の記述だとエラーになります。
twitterJson = [jsonString JSONValue];
うーん、.hでretainの設定してるんだけどな〜・・・ 時間があったら調べよう。
■friend_timelinesを写真付きでとりあえず、Basic認証で取得する例
- (void)viewDidLoad {
    NSString *urlString = @"http://UserID:Password@twitter.com/statuses/friends_timeline/yoo_yoo_yoo.json";
    NSURL *url = [NSURL URLWithString:urlString];
    NSString *jsonString = [NSString stringWithContentsOfURL:url
                                                    encoding:NSUTF8StringEncoding
                                                       error:nil];
    twitterJson = [[jsonString JSONValue] retain];
    [jsonString release];
    [super viewDidLoad];
}

- (UITableViewCell *)tableView:(UITableView *)tableView
         cellForRowAtIndexPath:(NSIndexPath *)indexPath {

    static NSString *CellIdentifier = @"Cell";

    UITableViewCell *cell = [tableView
                             dequeueReusableCellWithIdentifier:CellIdentifier];

    NSUInteger row = [indexPath row];
    if (cell == nil) {
        cell = [[[UITableViewCell alloc]
                initWithStyle:UITableViewCellStyleDefault
                reuseIdentifier:CellIdentifier]
                autorelease];
    }
    NSDictionary *rowValues = [self.twitterJson objectAtIndex:row];
    NSDictionary *userValues = [rowValues objectForKey:@"user"];
    NSString *image_url = [userValues objectForKey:@"profile_image_url"];
    NSURL *url = [NSURL URLWithString:image_url];
    NSData *data = [NSData dataWithContentsOfURL:url];
    UIImage *image = [[UIImage alloc] initWithData:data];
    cell.imageView.image = image;
    cell.textLabel.text = [rowValues objectForKey:@"text"];

    [image release];
    return cell;
}
ポイントは、画像の表示方法 NSData dataWithContentsOfURLでコンテンツデータを取得し、UIImage initWithDataで作成してやる。
この場合、pngじゃなくてもOKです。
あと、imageを意図的に作成してreleaseしてやらないと、メモリリークする予感です。

ようやく参考本の購読が300/600ページになりました(約1ヶ月・・・) でも、何気なく気に飛ばしていた「基礎の基礎」が抜けていたり(^^;) いや、この「基礎の基礎が」奥が深くて大変なんですよね。 という訳で、この辺で一旦スタートに戻ってちょっとだけかじってみます。
新規プロジェクトの種類
新規プロジェクトの種類は、プロジェクト作成時に対象のファイルを自動作成してくれます。 (逆に言えば、別に使わなくてもしこしこ書けるわけですが) 「作成されるテンプレートファイルが違う」事だけはわかっていても、具体的には把握していなかったり。 Carbon視点でiPhone探求を抜粋しました。
■Window-Based Application
「Window-Based Application」は、nibファイル(MainWindow.xib)に登録されているUIWindow (UIViewのサブクラス)に対して描画を実行するアプリケーションを作成します。 UIWindow上にビューやコントロールを配置したり、そこへQuartz 2D APIでダイレクトに2D描画を実行する ことで、アプリケーション機能を実現します。Mac OS Xで例えると、モニターのスクリーン上に必要なGUI を設置して、すべての処理を完結させてしまうタイプのアプリケーションだと考えれば良いでしょう (例えばFront Rowなど)。 このテンプレートが提供しているのが、一番簡単なiPhoneアプリケーションの構造です。
もっとも基本的なファイル構成。
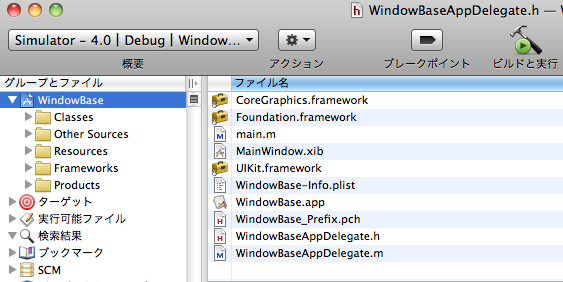 (1) AppDelegateについて
#import <UIKit/UIKit.h>
@interface WindowBaseAppDelegate : NSObject <UIApplicationDelegate> {
    UIWindow *window;
}
@property (nonatomic, retain) IBOutlet UIWindow *window;
@end
まずNSObjectについてApple Developper クラスによると、
Foundation フレームワークをベースにしたコードを書いている場合、そのルートクラスは一般的に NSObject です。 つまりは、実質最上位のオブジェクトとして考えればよいかと。
UIApplicationDelegateは、UIApplicationオブジェクトのデリゲートプロトコルです。
@protocol UIApplicationDelegate<NSObject>
ちなみに@protocolと@interfaceの違いは以下の通り - @protocolで要件宣 - @interfaceで採用宣言
UIApplicationのUIApplicationDelegateには、iPhoneが一連のアプリケーション動作をするために必要なメソッドが定義されています。
- (void)applicationDidFinishLaunching:(UIApplication *)application;
- (BOOL)application:(UIApplication *)application
 didFinishLaunchingWithOptions:(NSDictionary *)launchOptions
 __OSX_AVAILABLE_STARTING(__MAC_NA,__IPHONE_3_0);
- (void)applicationDidBecomeActive:(UIApplication *)application;
- (void)applicationWillResignActive:(UIApplication *)application;
- (BOOL)application:(UIApplication *)application handleOpenURL:(NSURL *)url;
- (void)applicationDidReceiveMemoryWarning:(UIApplication *)application;
- (void)applicationWillTerminate:(UIApplication *)application;
- (void)applicationSignificantTimeChange:(UIApplication *)application;
- (void)application:(UIApplication *)application
 willChangeStatusBarOrientation:(UIInterfaceOrientation)newStatusBarOrientation
 duration:(NSTimeInterval)duration;
- (void)application:(UIApplication *)application
 didChangeStatusBarOrientation:(UIInterfaceOrientation)oldStatusBarOrientation;
- (void)application:(UIApplication *)application
 willChangeStatusBarFrame:(CGRect)newStatusBarFrame;
- (void)application:(UIApplication *)application
 didChangeStatusBarFrame:(CGRect)oldStatusBarFrame;
// one of these will be called after calling -registerForRemoteNotifications
- (void)application:(UIApplication *)application
 didRegisterForRemoteNotificationsWithDeviceToken:(NSData *)deviceToken
 __OSX_AVAILABLE_STARTING(__MAC_NA,__IPHONE_3_0);
- (void)application:(UIApplication *)application
 didFailToRegisterForRemoteNotificationsWithError:(NSError *)error
 __OSX_AVAILABLE_STARTING(__MAC_NA,__IPHONE_3_0);
- (void)application:(UIApplication *)application
 didReceiveRemoteNotification:(NSDictionary *)userInfo
 __OSX_AVAILABLE_STARTING(__MAC_NA,__IPHONE_3_0);
- (void)application:(UIApplication *)application
 didReceiveLocalNotification:(UILocalNotification *)
 notification __OSX_AVAILABLE_STARTING(__MAC_NA,__IPHONE_4_0);
- (void)applicationDidEnterBackground:(UIApplication *)
 application __OSX_AVAILABLE_STARTING(__MAC_NA,__IPHONE_4_0);
- (void)applicationWillEnterForeground:(UIApplication *)
 application __OSX_AVAILABLE_STARTING(__MAC_NA,__IPHONE_4_0);
- (void)applicationProtectedDataWillBecomeUnavailable:(UIApplication *)
 application __OSX_AVAILABLE_STARTING(__MAC_NA,__IPHONE_4_0);
- (void)applicationProtectedDataDidBecomeAvailable:(UIApplication *)
 application    __OSX_AVAILABLE_STARTING(__MAC_NA,__IPHONE_4_0);
英訳すればそのままなんだろうけど、僕には全部覚える脳味噌はありません・・・ 日が暮れるというより人生が終わってしまいそうw まぁ、変更するケースになった時に覚えばいいのですが、なぜこのUIApplicationを継承するかは知っておく必要はありますね。 ちなみに、iPhone SDK4を入れたので、iPhone3用とiPhone4用で異なったメソッドがありますね。
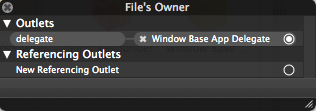
(2)MainWindow.xib
Window-Based Applicationでは、MainWindow.xibが自動作成されます。
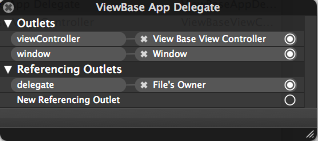
ソースで言うと、IBOutlet UIWindow *windowとMainWindow.xibのWindowが既にアウトレットとして設定されています。
(3)WindowBase-Info.plist
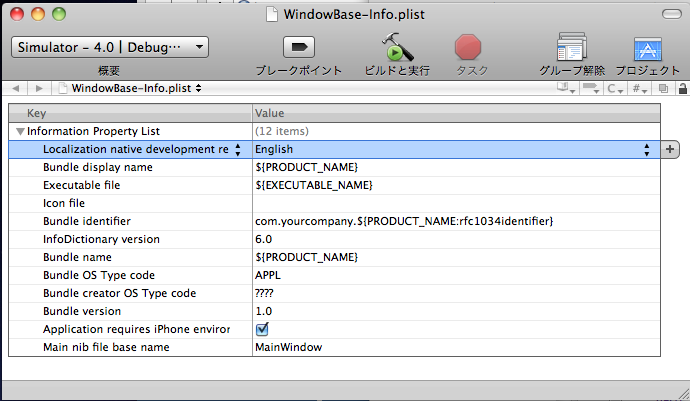 Localizationやiconなどアプリケーション設定をします。
XMLファイルですが、独立したEditorで編集できます。
Localizationやiconなどアプリケーション設定をします。
XMLファイルですが、独立したEditorで編集できます。
さて、次はフレームワークについて Apple Developper iPhone OSのフレームワーク
(4)UIKitフレームワーク Apple Developper iPhone OSテクノロジー
iPhone OS上のアプリケーションはすべてこのフレームワークを使用して、核となる以下の機能セットを実装します。
つまりは、iPhoneでUIを担当するフレームワークなので必須です。
MacOSXのアプリケーション開発メインフレームワークはCocoaで、UIを担当するApp Kitです。 iPhoneでは、AppKitの代わりにUIKitが採用されています。
(5)Foundationフレームワーク
Core Foundationフレームワーク(「Core Foundation」を参照)内の多くの機能へのObjective-Cの ラッパーを提供します。Foundationフレームワークは、以下の機能をサポートします。
-コレクションデータ型(配列、集合など) -バンドル -文字列管理 -日付と時刻の管理 -未加工データブロック管理 -環境設定管理 -URLおよびストリーム操作 -スレッドおよび実行ループ -Bonjour -通信ポート管理 -国際化
(6)CoreGraphicsフレームワーク Quartz 2D用のインターフェイスが含まれています。 ※Wikipedia Quart
■View-Based Application
「View-Based Application」では、 nibファイル(MainWindow.xib)にUIWindowとUIViewControllerが 用意されています。そして、この UIViewControllerのサブクラスをソースコードを記述し実装します。 また、UIViewControllerで使われるUIViewは別の nibファイルとして保存されており、アプリケーション 起動時に、このUIViewがスクリーン全体に表示されます。前のふたつのテンプレートでは、 UIWindowは単に UIViewを置く場所でしたが、UIViewControllerの方は、Cocoaのウィンドウと似た機能をアプリケーションに 提供します。 Mac OS X的に言えば、ダイアログやウィンドウをひとつだけオープンし、それですべての処理を完結させる タイプのアプリケーションを開発する時に使うと考えてください。 そういう意味では、このテンプレートは「ViewController-Based Application」と呼んだ方が良いかもしれ ません。
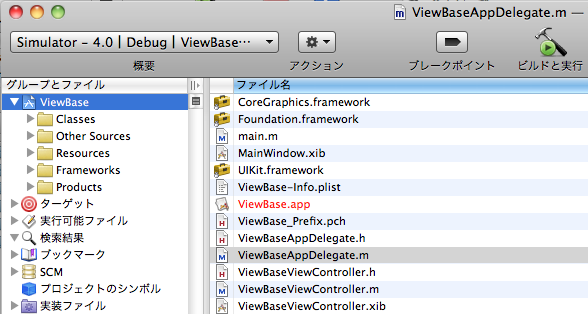 WindowBaseアプリケーションをベースに以下のViewController系のファイルが追加されます。
-ViewController.h (UIViewControllerを継承)
-ViewController.m
-ViewController.xib
WindowBaseアプリケーションをベースに以下のViewController系のファイルが追加されます。
-ViewController.h (UIViewControllerを継承)
-ViewController.m
-ViewController.xib
これも基本的なプロジェクトですね。
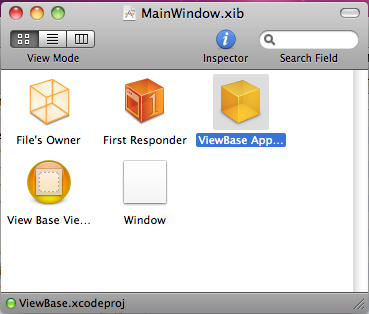
-MainWindow.xib
 AppDeglegateのアウトレット
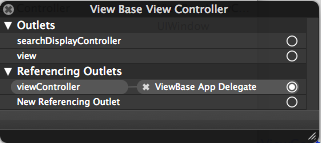
 ViewControllerのアウトレット
■OpenGL ES Application
「OpenGL ES Application」は、UIWindow(UIViewのサブクラス)上にひとつだけUIViewを配置し、 それをEAGLViewクラスと定義してから、その内容をソースコードで実装します。そしてUIViewの幾つかの メソッドをオーバライドすることで、 EAGLView上にOpenGL APIによる3D描画ができる環境を形成します。 Mac OS XのCocoaならば、スクリーンと同サイズのウィンドウをオープンし、その上にNSOpenGLViewを配置 した状況だと考えてください。また Carbonであれば、スクリーン自体をOpenGL描画環境で「キャプチャ」 した状態と同じです。これは、一般的な3Dゲームを開発するのに向いているテンプレートです (ところで何故アイコンは碁盤なのでしょうか?)。
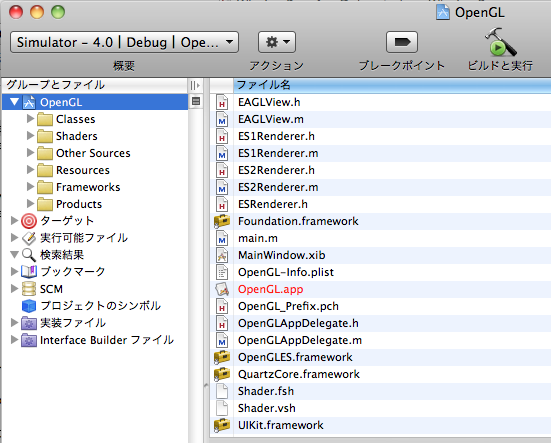 一気にファイルが増えました。
ちと、3Dゲーム系はノータッチなので、OpenGL開発が出てきた時に追記します。
一気にファイルが増えました。
ちと、3Dゲーム系はノータッチなので、OpenGL開発が出てきた時に追記します。
■Utility Application
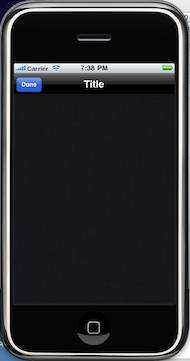
「Utility Application」では「View-Based Application」と同じように、nibファイル(MainWindow.xib) にUIWindowと UIViewController(RootViewController)を用意します。 しかしView-Based Applicationの時とは異なり、RootViewController経由で操作するのは、MainViewControllerと FlipsideViewControllerの2つのUIViewControllerです。 このふたつのクラスはソースコードで実装されます。それぞれのUIViewControllerに配置されるUIViewの方は、 MainView.xibとFlipsideView.xibという二つのnib ファイルに保存されています。 このテンプレートでは、用意した2つのUIViewControllerをCore Animatiuonの機能を使い切り替えることが 可能で、ダッシュボードの「Widget」をiPhone内に実現した感じとなります。 Mac OS X的に言えば、あるウィンドウから別ダイアログを表示して処理を続けるタイプのアプリケーションで す。
ViewBase Applicationに、FlipsideView系のファイルが追加されます。
デフォルトだとメインウィンドウのインフォボタンをクリックすると、Flipside.xibでレイアウトしたウィンドウが回転して開きます。
#import
@protocol FlipsideViewControllerDelegate;
@interface FlipsideViewController : UIViewController {
    id <FlipsideViewControllerDelegate> delegate;
}
@property (nonatomic, assign) id <FlipsideViewControllerDelegate> delegate;
- (IBAction)done:(id)sender;
@end
@protocol FlipsideViewControllerDelegate
- (void)flipsideViewControllerDidFinish:(FlipsideViewController *)controller;
@end
id delegate
の構文がなんか気持ち悪い・・・。 あと、なぜFlipsideViewControllerDelegateで2回プロトコルしてるのだろう???(謎)
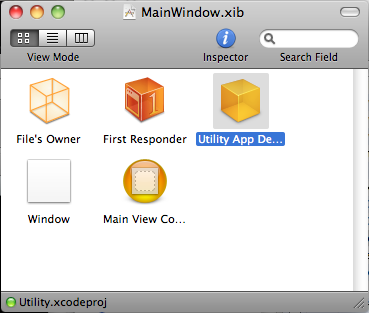
-MainWindow.xib
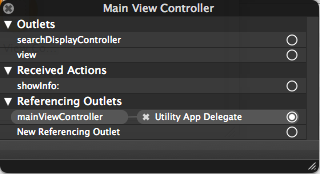
 MainViewControllerのアウトレット
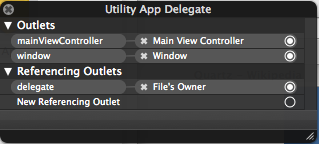
 AppDelegateのアウトレット
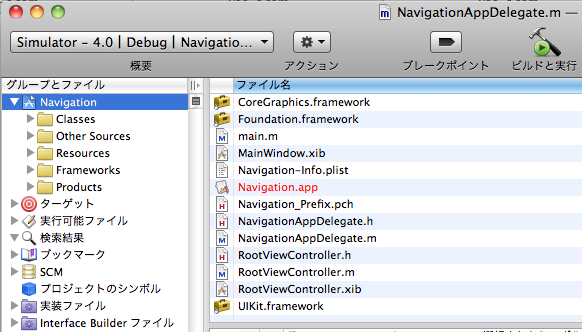
■Navigation-Based Application
「Navigation-Based Application」は、 nibファイル(MainWindow.xib)にUIWindowと UINavigationControllerを用意します。 UINavigationControllerはUIViewControllerを継承しており、複数のUIViewControllerを管理し、 その表示を切り替える機能を利用できます。ここでは、管理対象としてUIViewController(RootViewController)が ひとつだけ用意されていますが、テンプレートを拡張して複数のUIViewControllerを追加することが可能です。 ちなみに、 RootViewControllerクラス自体はソースコードで実装されています。 RootViewControllerで利用されるUIView(UITableView)は、別のnibファイルである RootViewController.xib に用意されています。 Mac OS X的に言えば、目的に応じて階層化された複数のウィンドウを切り替えることで作業を進めるタイプ のアプリケーションだと考えれば良いでしょう。
ナビゲーションでViewを階層化して表現するアプリに適してます。
ナビゲーション第一階層としてRootViewController系のファイルが作成されています。
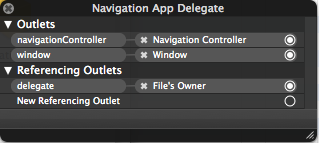
#import <UIKit/UIKit.h>
@interface NavigationAppDelegate : NSObject <UIApplicationDelegate> {
    UIWindow *window;
    UINavigationController *navigationController;
}
@property (nonatomic, retain) IBOutlet UIWindow *window;
@property (nonatomic, retain) IBOutlet UINavigationController *navigationController;
@end
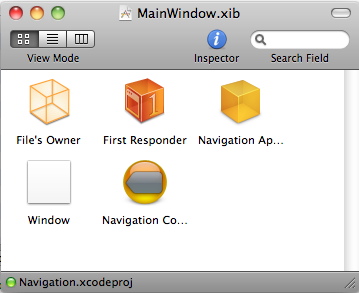
-MainWindow.xib
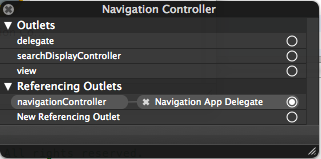
 NavigationControllerのアウトレット
 AppDelegateのアウトレット
 NavigationControllerはRootViewControllerから読み込まれています。
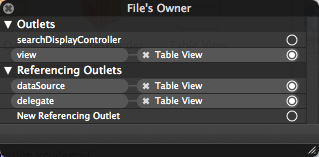
-RootViewController.xib
 TableViewがUIViewとして設定されています。
 File's Ownerのアウトレット
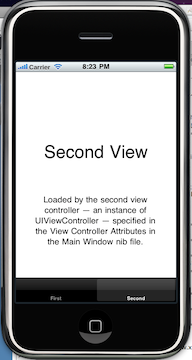
■Tab Bar Application
「Tab BarApplication」では、 nibファイル(MainWindow.xib)にUIWindowと UITabBarControllerが用意 されています。 このUITabBarControllerのタブ数は2に設定されています。 ひとつ目のタブをタップして表示される内容は、FirstViewControllerクラスとしてソースコードで実装されて いますが、ふたつ目のタブのタップで表示される内容は、nibファイルのSecondView.xibに登録されている UIViewです。 ユーザがタップ可能なタブの数を増やせば、さらに多くの UIViewControllerやUINavigationControllerを管理 することが可能です。 機能的にはウィンドウ上に配置したタブコントロールに似ているのですが、 Mac OS X的に言えば、 多数のウィンドウを切り替えて作業を行う大規模なアプリケーション向けのテンプレートです。
文字通りTabBarナビゲーションを利用して画面を切り替えます。
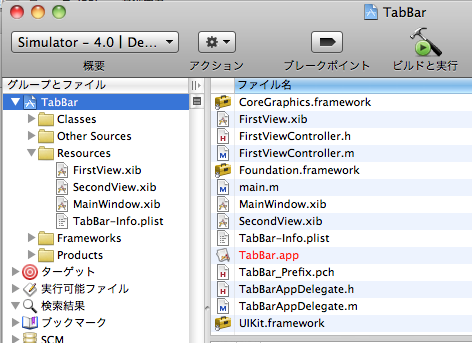
デフォルトでは、FirstViewController、SecondViewController系のファイルが作成されています。 これらViewの管理は、AppDelegateファイルが管理しています。
#import <UIKit/UIKit.h>
@interface TabBarAppDelegate : NSObject <UIApplicationDelegate, UITabBarControllerDelegate> {
    UIWindow *window;
    UITabBarController *tabBarController;
}

@property (nonatomic, retain) IBOutlet UIWindow *window;
@property (nonatomic, retain) IBOutlet UITabBarController *tabBarController;
@end
TabBarを利用するのでUITabBarControllerDelegateを継承しています。
FirstViewController、SecondViewControllerのViewはMainWindow.xibのUITabBarで設定(NibName)しています。
Tab Bar Applicationの作成方法はマルチビュー参照 ※プロジェクトはWindow-Based Applicationをベースに作成

会社の開発環境をDebian etchからDebian lenny(5.x系)にアップグレードしてみる。 coLinuxで動かしてるので、バックアップはあるからちょっと思い切ってw
■参考 ・etch から lenny へのアップグレード ・インストール前からインストール直後ぐらいまでの FAQ ・Debian lennyをインストール
■/etc/apt/source.list
deb http://ftp.jp.debian.org/debian lenny main contrib non-free deb http://security.debian.org lenny/updates main contrib non-free deb http://ftp.jp.debian.org/debian-volatile lenny/volatile main contrib
■アップグレード
# aptitude update # aptitude dist-upgrade
dist-upgrade & All Enter Key(笑)はちと怖いけど、まぁ自分の環境なので(^^;)
■ディストリビューションのバージョン確認
# cat /etc/debian_version 5.0.4
■カーネルのバージョン確認
# uname -a Linux colinux.yoo 2.6.22.18-co-0.7.3 #1 PREEMPT Sat May 24 22:27:30 UTC 2008 i686 GNU/Linux
■Apache Apacheの設定もecthからlennyに変わって、モロモロ変わってしまっていたのでリストアする。 ※多分 All Enter Key(笑)の影響・・・
・/etc/apache2/sites-available/defaultは「default.dpkg-old」でバックアップされている
# cp default default_20100624 # cp default-ssl default-ssl_20100624 # cp default.dpkg-old default # default-ssl.dpkg-old default-ssl
・/etc/apache2/ports.confは「ports.conf.dpkg-old」でバックアップされている
# cp ports.conf ports.conf_20100624 # cp ports.conf.dpkg-old ports.conf
・conf.d/securityってファイルが登場 ・apache2.confがlennyの場合、設定ファイルのみ記述 ・UTF-8のコメントを有効化
#vi /etc/apache2/conf.d/charset AddDefaultCharset UTF-8
Apache再起動
# /etc/init.d/apache2 restart
■PostgreSQL8.3アップデート 現在、8.1で運用しているが、8.3系にアップしてみる。 現在の開発はPostgreSQLはWindows(PostgreSQL88.3系)で動かしてるので、clientだけ入ってればいいのだが、 PostGISとかはテストしてみたいので。
# /etc/init.d/postgresql-8.1 stop # aptitude install postgresql-8.3
8.3の設定ファイルが、ポート5433になっているので5432に変更する。 また、ssl = trueになってるのでこれもコメントアウト。
# vi /etc/postgresql/8.3/main/postgresql.conf
設定は、サービスのパスは違えどCentOSで設定したのと同じ。
# /etc/init.d/postgresql-8.3 start
と起動したが、うまくいかない。 調べたら「/var/run/postgresql/」のプロセスファイルがロックされているのが原因ぽい。 なので、力技で削除して、再度起動w
# cd /var/run/postgresql/ # rm * # /etc/init.d/postgresql-8.3 start
これでも起動しないときがある・・・と思ったら、coLinuxのHD容量が100%だったwww

WEB+DBの記事を参考にPostGISをインストール
# aptitude search postgis # aptitude install postgresql-8.3-postgis
■template作成
# su postgres postgres$ createdb postgistemplate postgres$ createlang plpgsql postgistemplate
予めSQLが用意されてるので実行する。 ※WEB+DBだとlwpostgis_upgrade.sqlの取り込みがないが、2010/6/24現時点では必要
postgres$ psql -d postgistemplate -f /usr/share/postgresql-8.3-postgis/lwpostgis.sql postgres$ psql -d postgistemplate -f /usr/share/postgresql-8.3-postgis/lwpostgis_upgrade.sql postgres$ psql -d postgistemplate -f /usr/share/postgresql-8.3-postgis/spatial_ref_sys.sql
ん?何か、spatial_ref_sys.sqlで「transaction block」エラーが出てるぽいよ(_)
どうやらPostgreSQL8.1の混在が悪さしてるらしいので、PostgreSQL関連を全て削除して再インストールしたら うまくいきました。
■gisユーザの作成 WEB+DBにはgisユーザを作れと書いてあるけど、煩わしいのでpostgresユーザでw
■DB作成 テンプレートをpostgistemplate 、エンコードはUTF-8でDBを作成する。
postgres@colinux:~$ createdb -T postgistemplate -E UNICODE gisdb postgres@colinux:~$ psql -l List of databases Name | Owner | Encoding -----------------+----------+----------- gisdb | postgres | UTF8 postgistemplate | postgres | UTF8 postgres | postgres | SQL_ASCII template0 | postgres | SQL_ASCII template1 | postgres | SQL_ASCII
■データダウンロード 国土地理院基盤地図情報の閲覧・ダウンロードからJPGIS2.0形式をダウンロードできます。 ▽基盤地図情報(縮尺レベル25000) ら全都道府県を全部開いて「行政区画の境界線及び代表点」を一つずつ 選択してダウンロード(苦)
てか、47 x 2クリック・・・何だこの使いにくさは!>国交省w
▽基盤地図情報閲覧コンバートソフト JPGIS形式をPostGISに変換するコンバータをダウンロード
■基盤地図情報閲覧コンバートソフト (1) 新規プロジェクト作成 (2) 読み込むファイルにダウンロードしたzipファイルを選択して読み込み (3) コンバート > シェープファイルへの出力を選択 (4) 「行政区間25000」「直交座標系にして変換」にチェックし「9系」を選択して書き出し (5) AdmArea.shpが書き出される
■SQL変換・実行 AdmArea.shpをSJISでareas.sqlに変換し、areas.sqlをUTF-8に変換してから実行する。
postgres$ shp2pgsql -W "SJIS" -s 2451 AdmArea.shp areas > areas.sql postgres$ nkf -w --overwrite areas.sql postgres$ psql -d gisdb < areas.sql
■座標の変換
ALTER TABLE areas ADD COLUMN wgs_geom GEOMETRY; UPDATE areas SET wgs_geom = TRANSFORM(the_geom, 4326); CREATE INDEX areas_gist on areas USING GIST(wgs_geom GIST_GEOMETRY_OPS);
■実行例 ▽世田谷区に隣接した市区町村を取得 ST_INTERSECTSというストアドプロシジャが用意されている。
SELECT 行政コード,名称 FROM areas WHERE ST_INTERSECTS ( the_geom, (SELECT the_geom FROM areas WHERE 行政コード = 13112) );
すげぇw これは位置ゲームに使えそう!
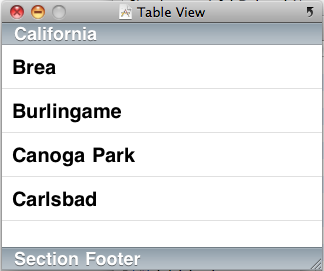
--2010/08/20追記 UITableViewを使った階層データの取り扱いはこのサイトが非常にわかりやすいです。
参考サイト
<a href="http://ameblo.jp/xcc/theme-10017889214.html target="_blank">【iPhoneアプリ開発ドリル】テーブルとナビゲーションを理解する
始めたばかりの頃の記事なので、以下の内容はあまり参考にならないかも・・・ いずれ自分なりにまとめてたいと思います。
UITableViewでNSDictionaryのデータをセクション表示した後、行を選択した時のデータ取得方法
外部ファイルに読み込まれるデータ定義
まずUITableViewに表示するデータを定義します。@property (nonatomic, retain) NSDictionary *allNames;
@property (nonatomic, retain) NSMutableDictionary *names;
@property (nonatomic, retain) NSMutableArray *keys;
行を選択した時の処理
-(void)tableView:(UITableView *)tableView
 didSelectRowAtIndexPath:(NSIndexPath *)indexPath {
    NSInteger row = [indexPath row];
    NSInteger currentSection = indexPath.section;
    NSString *key = [keys objectAtIndex:currentSection];
    NSArray *nameSection = [names objectForKey:key];
    NSString *currentName = [nameSection objectAtIndex:row];

NSString *message = [[NSString alloc]
                     initWithFormat:@"%@", currentName];
UIAlertView *alert = [[UIAlertView alloc]
                      initWithTitle:@"Select Player"
                      message:message
                      delegate:nil
                      cancelButtonTitle:@"OK"
                      otherButtonTitles:nil
                      ];
[alert show];
[message release];
[alert release];
[key release];


}
UITableView.hのソースを見ると
@interface NSIndexPath (UITableView)
+ (NSIndexPath *)indexPathForRow:(NSUInteger)row inSection:(NSUInteger)section;
@property(nonatomic,readonly) NSUInteger section;
@property(nonatomic,readonly) NSUInteger row;
@end
メッセージ式で[indexPath section]と書いても同じ事です
しかしdidSelectRowAtIndexPathで選択オブジェクトを返してくれればいいと思うのは、 ActionScript系脳なのかな?w これがベストプラクティスなのかどうかはわからないけど・・・ --2010/07/22追記 行をクリックしたらというイベント系のメソッドなのでその方が都合が良い。 indexPathを使ってオブジェクトを自由に取得できるし。 --
話はそれますが、メッセージでネストしてやると以下のコードになります。
-(void)tableView:(UITableView *)tableView
 didSelectRowAtIndexPath:(NSIndexPath *)indexPath {
    UIAlertView *alert = [[UIAlertView alloc]
                          initWithTitle:@"Select Player"
                          message:[[NSString alloc] initWithFormat:@"%@",
                                   [[names objectForKey:
                                     [keys objectAtIndex:indexPath.section]]
                                    objectAtIndex:[indexPath row]]
                                   ]
                          delegate:nil
                          cancelButtonTitle:@"OK"
                          otherButtonTitles:nil
                          ];
    [alert show];
    [alert release];
}
--2010/07/22追記 init系のメソッドは、返されるオブジェクトを考慮してネストする事が推奨されている模様なので、initWithFormat等は暗黙の了解でネストしている。 結局はメモリ管理をどうするかによって、書き方が異なりそう。
まだ十分に把握できてないけど、この辺りはパフォーマンスチューニングとして頭の片隅においておいた方が良いかも。

JavaScriptのわかりにくさと言うか、面倒くさい実装の一つ「拡張」 そもそも「クラス」という概念ではなく「プラグイン」と定義している。
という事で、プラグイン拡張をjQuery API jQuery.extend()でお勉強
■拡張の定義
var object = $.extend({}, object1, object2);
■最初のオブジェクト(objects1)を変更して、object1とobject2をマージ
var object1 = {
  apple: 0,
  banana: {weight: 52, price: 100},
  cherry: 97
};
var object2 = {
  banana: {price: 200},
  durian: 100
};

$.extend(object1, object2);
実行結果
object1 === {apple: 0, banana: {price: 200}, cherry: 97, durian: 100}
object1のbananaオブジェクトが、object2のbananaオブジェクトで上書きされている
■最初のオブジェクト(objects1)を変更して、objects1、objects2を再帰的にマージ
var object1 = {
  apple: 0,
  banana: {weight: 52, price: 100},
  cherry: 97
};
var object2 = {
  banana: {price: 200},
  durian: 100
};

$.extend(true, object1, object2);
実行結果
object1 === {apple: 0, banana: {weight: 52, price: 200}, cherry: 97, durian: 100}
bananaオブジェクトの中身まで検証し、object2の値が優先で上書きされる
■settingsを変更して、defaultsとoptionsをマージ
var settings = { validate: false, limit: 5, name: "foo" };
var options = { validate: true, name: "bar" };
jQuery.extend(settings, options);
実行結果
settings == { validate: true, limit: 5, name: "bar" }
■defaultsを変更せずに、defaultsとoptionsをマージ
var empty = {}
var defaults = { validate: false, limit: 5, name: "foo" };
var options = { validate: true, name: "bar" };
var settings = $.extend(empty, defaults, options);
実行結果
settings == { validate: true, limit: 5, name: "bar" } empty == { validate: true, limit: 5, name: "bar" }
マージされたオブジェクトはemptyに格納されている