NSDate は NSDateFormmatter で日付表示できますが、各要素を直接取得する事はできません。 そこで、NSDateComponents を使って曜日などを取得するわけですが、ここでハマりました。
NSDateComponents: components: fromDate の第1引数です。 これをネットから安易にコピって使っていたら変な挙動が。。。
    NSDate *now = [NSDate date];
    NSDateComponents *dateComps = [calendar components:
                                   NSYearCalendarUnit   |
                                   NSMonthCalendarUnit  |
                                   NSDayCalendarUnit    |
                                   NSHourCalendarUnit   |
                                   NSMinuteCalendarUnit |
                                   NSSecondCalendarUnit
                                              fromDate:now];
        NSInteger year = dateComps.year;
        NSInteger month = dateComps.month;
        NSInteger day = dateComps.day;
        NSInteger weekday = dateComps.weekday;
この例だと、year,month,day は正常な値が返ってきますが、weekday がオーバーフロー(?)な値が返ってきます。 よく見ると、
「NSWeekdayCalendarUnit」が抜けている。。。
    NSDate *now = [NSDate date];
    NSDateComponents *dateComps = [calendar components:
                                   NSYearCalendarUnit   |
                                   NSMonthCalendarUnit  |
                                   NSDayCalendarUnit    |
                                   NSHourCalendarUnit   |
                                   NSMinuteCalendarUnit |
                                   NSSecondCalendarUnit |
                                   NSWeekdayCalendarUnit
                                              fromDate:now];
        NSInteger year = dateComps.year;
        NSInteger month = dateComps.month;
        NSInteger day = dateComps.day;
        NSInteger weekday = dateComps.weekday;
こういうシンプルな例なら気づきやすいですが、今回色々日付処理をかましていたので他に原因があるのではないか?とあらぬ方向を彷徨っていました。 まぁ、ちゃんと理解していればすぐ気づくのでしょうが、コピペは怖い!

MacPorts の導入やメンテが非常に面倒くさいので、Homebrew に環境を移行中。
PostgreSQL
$ brew install postgresql
既に PostgreSQL がインストールしてあり最新バージョンにしたい場合は、再インストールします。
$ brew reinstall postgresql
$ psql --version
psql (PostgreSQL) 12.3
また、パッケージを指定する場合は検索してインストールします。
$ brew search postgresql
==> Formulae
postgresql ✔     postgresql@10    postgresql@11 ✔  postgresql@9.4   postgresql@9.5   postgresql@9.6
==> Casks
navicat-for-postgresql
$ brew install  postgresql@11
PHP
php.rb をダウンロードし、「brewホーム/Library/Formula」 に移動する。
$ curl -O https://raw.github.com/ampt/homebrew/php/Library/Formula/php.rb $ mv php.rb `brew --prefix`/Library/Formula
PHP を確認する。
$ brew search php gearman-php memcache-php midgard2-php pcntl-php phpmyadmin mcrypt-php memcached-php mongo-php php solr-php
$ brew options php php --with-mysql Include MySQL support --with-pgsql Include PostgreSQL support --with-mssql Include MSSQL-DB support --with-fpm Enable building of the fpm SAPI executable --with-apache Build shared Apache 2.0 Handler module --with-intl Include intl extension --with-readline Include readline extension
自分の場合、すぐにインストールできなかったので以下のアップデートして問題を確認する。
$ brew update
$ brew doctor
 ... If you didn't put them there on purpose they could cause problems when building Homebrew formulae, and may need to be deleted. Unexpected dylibs: /usr/local/lib/libtesseract.3.dylib ...
どうやら、前に入れた tesseract が悪さしているみたいなので削除する。
$ sudo rm /usr/local/lib/libtesseract.*
$ cd /usr/local/include/ $ sudo rm -rf tesseract/
PHP をオプション付きでインストールする。
$ brew install https://raw.github.com/adamv/homebrew-alt/master/duplicates/php.rb --with-mysql --with-pgsql --with-apache --with-intl
Twitter で サバクラ両方で動く JavaScript の大規模開発を行うために — Gist がつぶやかれてたので自分メモ。
MVC,Model2, MVP, MVVM の比較について分析している。
この辺は自分のアプリがどういう性質なのかによったり、リファクタリングで自然にそうなっていた!とか、コーディングしないとわからないですよね(少なくとも自分は)。
気が向いたら読み直そう(汗)
画面固定/制御の方法よく忘れてしまうのでメモ
理屈的には、画面回転時の delegate メソッドで shouldAutorotateToInterfaceOrientation() で与えられた toInterfaceOrientation を判断する。
がその前に、回転に関しては UIDeviceOrientation、UIInterfaceOrientation 2種類存在する。
UIDeviceOrientation と UIInterfaceOrientation
UIDeviceOrientation はデバイスの向きを判別フラグだが、以下の7種類がある
typedef enum {
    UIDeviceOrientationUnknown,    //向き不明
    UIDeviceOrientationPortrait,            // HomeButton 下
    UIDeviceOrientationPortraitUpsideDown,  //HomeButton 上
    UIDeviceOrientationLandscapeLeft,       // HomeButton 右(左向き)
    UIDeviceOrientationLandscapeRight,      //HomeButton 左(右向き)
    UIDeviceOrientationFaceUp,              // 表
    UIDeviceOrientationFaceDown             // 裏
} UIDeviceOrientation;
UIInterfaceOrientation は以下の4種類
typedef enum {
    UIInterfaceOrientationPortrait           = UIDeviceOrientationPortrait,
    UIInterfaceOrientationPortraitUpsideDown = UIDeviceOrientationPortraitUpsideDown,
    UIInterfaceOrientationLandscapeLeft      = UIDeviceOrientationLandscapeRight,
    UIInterfaceOrientationLandscapeRight     = UIDeviceOrientationLandscapeLeft
} UIInterfaceOrientation;
shouldAutorotateToInterfaceOrientation() の toInterfaceOrientation は UIInterfaceOrientation 型なのでこちらを利用します。 逆に UIDeviceOrientation は NSNotification で検知して、センサーアプリの判別に使う感じです。 (センサーアプリを作った事がないのであれですが・・・)
と言う訳で、UIInterfaceOrientation で画面向きの制御をしてみます。
常に回転させない
常に回転させない場合は、shouldAutorotateToInterfaceOrientation() を記述しないか、NOを返してやればよい。
-(bool)shouldAutorotateToInterfaceOrientation:(UIInterfaceOrientation)toInterfaceOrientation {
    return NO;
}
よってアプリケーション単位で常に固定したい場合は、plist の Initial interface orientation で縦、横の設定をし、shouldAutorotateToInterfaceOrientation() しなければよい。
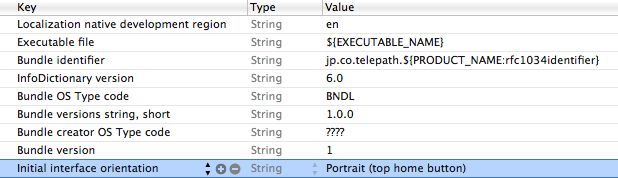
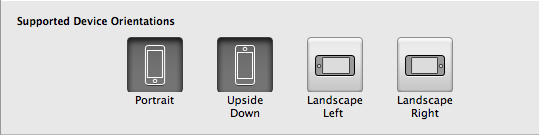
また、Xcode4 では TARGETS > Summary に Supported Device Orientations 設定があり、サポートする回転設定が plist と連動するので便利です。
ちなみに shouldAutorotateToInterfaceOrientation() も plist も設定しないと縦固定になるようです。
縦上固定
-(bool)shouldAutorotateToInterfaceOrientation:(UIInterfaceOrientation)toInterfaceOrientation {
    return (toInterfaceOrientation == UIInterfaceOrientationPortrait);
}
縦下固定
-(bool)shouldAutorotateToInterfaceOrientation:(UIInterfaceOrientation)toInterfaceOrientation {
    return (toInterfaceOrientation == UIDeviceOrientationPortraitUpsideDown);
}
縦固定
-(bool)shouldAutorotateToInterfaceOrientation:(UIInterfaceOrientation)toInterfaceOrientation {
    return (interfaceOrientation == UIInterfaceOrientationPortrait
            || interfaceOrientation == UIDeviceOrientationPortraitUpsideDown);
}
左横固定
-(bool)shouldAutorotateToInterfaceOrientation:(UIInterfaceOrientation)toInterfaceOrientation {
    return (toInterfaceOrientation == UIDeviceOrientationLandscapeLeft);
}
右横固定
-(bool)shouldAutorotateToInterfaceOrientation:(UIInterfaceOrientation)toInterfaceOrientation {
    return (toInterfaceOrientation == UIDeviceOrientationLandscapeRight);
}
横固定
- (BOOL)shouldAutorotateToInterfaceOrientation:(UIInterfaceOrientation)interfaceOrientation
{
    return (interfaceOrientation == UIInterfaceOrientationLandscapeRight
            || interfaceOrientation == UIInterfaceOrientationLandscapeLeft);
}
何か if 文で読みづらいのでサブクラスして、わかりやすくするのもありかな?とも思ったりします。。。
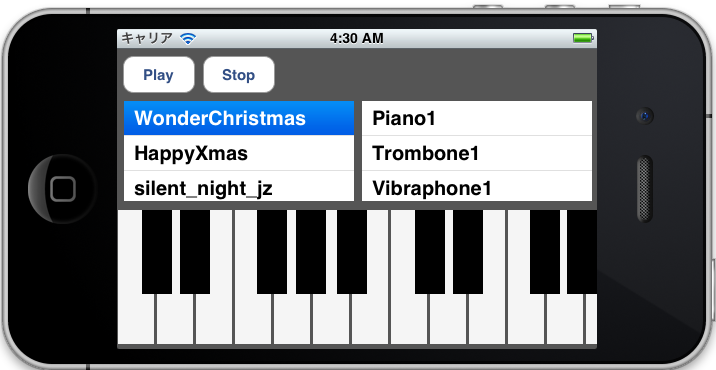
今回思い切って、iOS Advent Calendar2011 に参加してみました。
しかも最終日自分でいいのか?と思いましたが・・・最終回のネタは「MusicPlayer」です。
 そして25日ということで、
クリスマスソングを再生させていただきます
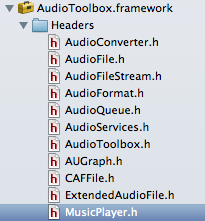
MusicPlayer は OSX には既に存在していますが iOS5 から AudioToolbox.framework に追加された機能で、簡単に言うと音楽シーケンサーです。
 ドキュメントを見る限り、OSX の機能はフルには使えないようですが、基本的な機能は利用できます。
MusicPlayer の有利性
個人的に作ったアプリ「Chordlead」で、OpenALを利用した簡単な演奏機能をつけました。 が、シーケンス機能は完全に独自で実装してかなり苦労した部分で、もう少し楽にならないか?互換性を保ちたいと考えるようになりました。
MusicPlayer を使うメリットとして、以下の事項があげられると思います。
(1) SMF(Standard MIDI File)をサポートしている (2) MusicSequence (シーケンサー)が利用できる (3) AUGraph によるルーティングで内部音源が再生できる
ただし、MusicPlayer を利用するにしても AVAudioPlayer やSystem Sound を再生するのとは違い、下準備がそれなりに大変です。
利用する主なクラス
今回は MusicPlayer 以外に以下のクラスが頻繁に登場します。
(1) AudioUnit オーディオを生成してアプリケーションに提供する重要なプラグインです。 (2) AUNode オーディオは入力(マイク、音源)、エフェクト、出力と言った経路をたどって音が出ますが、AUNodeはそららを接続する単位です。 (3) AUGraph AUNode をまとめたものが AUGraph です。 AUGraph 同士を接続することもできます。
抽象的ですが、音楽機材を用意してケーブルで繋ぎ合わせるようなイメージでしょうか? と言う事で、実際にコーディングしてみました。
AVAudioSessionの設定
まず、AVAudioSession の設定と、ハードウェアのサンプリングレートを設定します。
- (BOOL) setupAudioSession
{
    AVAudioSession *audioSession = [AVAudioSession sharedInstance];
    [audioSession setDelegate: self];

    NSError *audioSessionError = nil;
    [audioSession setCategory: AVAudioSessionCategoryPlayback error: &audioSessionError];
    if (audioSessionError != nil) {NSLog (@"Error setting audio session category."); return NO;}

    _graphSampleRate = 44100.0;

    [audioSession setPreferredHardwareSampleRate: _graphSampleRate error: &audioSessionError];
    if (audioSessionError != nil) {NSLog (@"Error setting preferred hardware sample rate."); return NO;}

    [audioSession setActive: YES error: &audioSessionError];
    if (audioSessionError != nil) {NSLog (@"Error activating the audio session."); return NO;}

    _graphSampleRate = [audioSession currentHardwareSampleRate];

    return YES;
}
AVAudioSession setCategory では AVAudioSessionCategoryPlayback(iPhoneロック時でも再生) を設定し、サンプリングレートは 44.1kHz としました。 また、AVAudioSession では delegate を設定する事で、beginInterruption()、endInterruptionWithFlags () も利用する事ができます。
AUGraph、AUNode の作成
MusicPlayer を利用する前に、音源設定やオーディオのルーティングをしなければいけません。
まず、NewAUGraph で AUGraph を初期化します。
 OSStatus result = noErr;
    result = NewAUGraph(&_processingGraph);
次に、AudioComponentDescription で AUNode の入力側の設定詳細を設定します。
 AudioComponentDescription cd = {};
    cd.componentType = kAudioUnitType_MusicDevice;
    cd.componentSubType = kAudioUnitSubType_Sampler;
    cd.componentManufacturer = kAudioUnitManufacturer_Apple;
    cd.componentFlags = 0;
    cd.componentFlagsMask = 0;
        result = AUGraphAddNode(_processingGraph, &cd, &_samplerNode1);
componentType は、kAudioUnitType_MusicDevice(MIDI受信)componentSubType は kAudioUnitSubType_Sampler (内部音源 = サンプラー)を指します。 作成した AudioComponentDescription の情報を用いて、 AUGraph(_processingGraph) に 音源側の AUNode(_samplerNode1 )を追加します。
同様に、出力用の AUNode(_multiChannelMixerNode) を追加します。
 cd.componentType = kAudioUnitType_Output;
    cd.componentSubType = kAudioUnitSubType_RemoteIO;
        result = AUGraphAddNode(_processingGraph, &cd, &_multiChannelMixerNode);
各AUNode に対して AUGraphNodeInfo() を用いて AudioUnit と関連づけます。
result = AUGraphOpen(_processingGraph);
result = AUGraphNodeInfo(_processingGraph, _samplerNode1, 0, &_samplerUnit1);
result = AUGraphNodeInfo(_processingGraph, _multiChannelMixerNode, 0, &_multiChannelMixerAudioUnit);
AUGraphConnectNodeInput() で出力と入力の AUNode を接続し、AUGraph を設定していきます。
result = AUGraphConnectNodeInput(_processingGraph, _samplerNode1, 0, _multiChannelMixerNode, 0);
AudioUnit の作成
各 AudioUnit の再生、入出力設定し、最終的に AUGraph をスタートします。
- (void) configureAndStartAudioProcessingGraph: (AUGraph) graph {
    OSStatus result = noErr;
    UInt32 framesPerSlice = 0;
    UInt32 framesPerSlicePropertySize = sizeof (framesPerSlice);
    UInt32 sampleRatePropertySize = sizeof (_graphSampleRate);

    //Sample rate
    result = AudioUnitSetProperty (_multiChannelMixerAudioUnit,
                                   kAudioUnitProperty_SampleRate,
                                   kAudioUnitScope_Output,
                                   0,
                                   &_graphSampleRate,
                                   sampleRatePropertySize
                                   );

    result = AudioUnitSetProperty (_samplerUnit1,
                                   kAudioUnitProperty_SampleRate,
                                   kAudioUnitScope_Output,
                                   0,
                                   &_graphSampleRate,
                                   sampleRatePropertySize
                                   );

    //Audio slice
    result = AudioUnitGetProperty (_multiChannelMixerAudioUnit,
                                   kAudioUnitProperty_MaximumFramesPerSlice,
                                   kAudioUnitScope_Global,
                                   0,
                                   &framesPerSlice,
                                   &framesPerSlicePropertySize
                                   );

    result = AudioUnitSetProperty (_samplerUnit1,
                                   kAudioUnitProperty_MaximumFramesPerSlice,
                                   kAudioUnitScope_Global,
                                   0,
                                   &framesPerSlice,
                                   framesPerSlicePropertySize
                                   );

    //AUGraph initialize
    if (graph) {
        //initialize AUGraph.
        result = AUGraphInitialize(graph);

        //Start AUGraph
        result = AUGraphStart(graph);
    }
}
AudioUnit でオーディオを扱う場合、AudioUnitSetProperty() で設定し、サンプリングレートやオーディオスライスの調整をしますが、定義は以下の通りです。
AudioUnitSetProperty(AudioUnit inUnit,
                  AudioUnitPropertyID       inID,
                  AudioUnitScope            inScope,
                  AudioUnitElement      inElement,
                  const void *          inData,
                  UInt32                    inDataSize)
AudioUnitPropertyID は AudioUnit の種別 AudioUnitScope は、入出力関連の数値 AudioUnitElement は複数のBUS を利用する際に設定しますが、今回は1つだけなので 0です。 残りの引数は、データサイズを取得する為のものです。
音源楽器の設定
今回の楽器の音源方式は 「aupreset」ファイルを利用して、PCM音源でサウンド再生します。
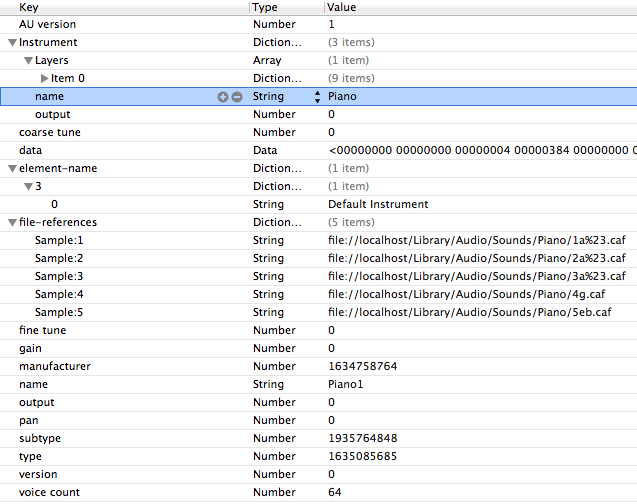 図のようにサンプリング音のパスは、 aupreset の URL で記述します。
ちなみに、このファイルを作らなくも MusicPlayer ではデフォルトで簡易音源(FM音源)が再生されます。
図のようにサンプリング音のパスは、 aupreset の URL で記述します。
ちなみに、このファイルを作らなくも MusicPlayer ではデフォルトで簡易音源(FM音源)が再生されます。
作成したaupreset ファイルを元に、AudioUnitSetProperty() で kAudioUnitProperty_ClassInfo で設定します。
- (OSStatus)loadSynthFromPresetURL: (NSURL *) presetURL
{
    CFDataRef propertyResourceData = 0;
    Boolean status;
    SInt32 errorCode = 0;
    OSStatus result = noErr;

    status = CFURLCreateDataAndPropertiesFromResource (
                                                       kCFAllocatorDefault,
                                                       (__bridge CFURLRef) presetURL,
                                                       &propertyResourceData,
                                                       NULL,
                                                       NULL,
                                                       &errorCode
                                                       );

    CFPropertyListRef presetPropertyList = 0;
    CFPropertyListFormat dataFormat = 0;
    CFErrorRef errorRef = 0;
    presetPropertyList = CFPropertyListCreateWithData (
                                                       kCFAllocatorDefault,
                                                       propertyResourceData,
                                                       kCFPropertyListImmutable,
                                                       &dataFormat,
                                                       &errorRef
                                                       );

    if (presetPropertyList != 0) {
        result = AudioUnitSetProperty(_samplerUnit1,
                                      kAudioUnitProperty_ClassInfo,
                                      kAudioUnitScope_Global,
                                      0,
                                      &presetPropertyList,
                                      sizeof(CFPropertyListRef)
                                      );
        CFRelease(presetPropertyList);
    }

    if (errorRef) CFRelease(errorRef);
    CFRelease(propertyResourceData);

    return result;
}
caf ファイル作成
サンプリング音のデータフォーマットは 今回 caf ファイルを利用しますが、OSX のターミナルでコマンドでコンバートする事ができます。
/usr/bin/afconvert -f caff -d aac piano_Bb.m4a piano_Bb.caf
ちなみにピアノのサンプリング音は、自宅のデジタルピアノから5音サンプリングしました。
MusicPlayer を使う
さて、ようやく本題です。 まず、MusicSequence のインスタンスを NewMusicSequence() で作成します。
   MusicSequence sequence = NULL;
    if (NewMusicSequence(&sequence) != noErr) NSLog(@"error");
次にリソース内の mid ファイルを MusicSequenceFileLoad() で読み込みます。
    NSString *soundName = [_songs objectAtIndex:songIndex];
    NSString *midiPath = [[NSBundle mainBundle] pathForResource:soundName ofType:@"mid"];
    inPathToMIDIFile = (__bridge CFURLRef)[NSURL fileURLWithPath:midiPath];
    result = MusicSequenceFileLoad(sequence, inPathToMIDIFile,
                                   kMusicSequenceFile_MIDIType,
                                   kMusicSequenceLoadSMF_ChannelsToTracks);
MusicSequenceFileTypeID は MIDIファイルなので kMusicSequenceFile_MIDIType MusicSequenceLoadFlags は 現在 kMusicSequenceLoadSMF_ChannelsToTracks しかありません。
NewMusicPlayer() で MusicPlayer インスタンスを生成し、MusicPlayerSetSequence() で先ほど作成した MusicSequence を設定します。
    result = NewMusicPlayer(&musicPlayer);
    result = MusicPlayerSetSequence(musicPlayer, sequence);
最後にMusicSequence と AUGraph を接続し、シーケンサーを再生します。
    result = MusicSequenceSetAUGraph(sequence, _processingGraph);
    result = MusicPlayerStart(musicPlayer);
と、長々と実装してきましたが、再生はできるものの色々と問題がでてきました。
課題・問題点
(1) マルチチャンネルで楽器を再生できない 単にピアノ、ギターなどの単体楽器アプリなら今回のように問題なくMIDI再生できますが、現状バンド形式のように
複数の楽器を演奏する方法がわからず実装できませんでした
AUGraph で音源とBUS 設定でごにょごにょしてやれば可能かも知れませんが、そもそもMusicPlayer側でMIDIチャンネルをちゃんと認識してルーティングできるかが不明です。
(2) MIDI のコントロールチェンジ(CC)は反映されている? 今回、検証用として「HappyXmas」を自分で MIDI データ作ってみたのですが、PC(QuickTime)の再生 と iOS の再生が如実に違います。
特に CC64(サスティン)が効かず(?)ところどころブツブツ切れて不自然です
iOS上では何らかの理由で細かなニュアンスが再現できないようです。 設定が悪いのか?SMFファイルの作りが悪いのか?はたまたCC自体有効にならないのかが不明です。
という訳で、何とか「MusicPlayer」でクリスマスソングを再生することができました。
今回のサンプル
- Github MusicTest ※最適化されてませんので途中で落ちる場合があります ※中のMIDIファイルは、あくまでも検証ファイルですのでご注意を
参考
iOS5 から Twitter が標準で利用できるようになったので使ってみた。
ちなみに、実装アプリとしてうちの会社でリリースした六曜が検索できるアプリ「Rokuyou」の占い投稿で利用してます(^_^)
Twitter Developer でドキュメント
Twitter API Content tagged with iOS5 が結構充実しているかと思います。
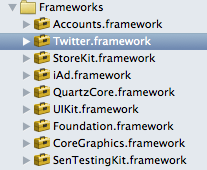
Twitter.framework
Twitter を利用するには、Twitter.framework を追加し、ソースに Twitter.h をimport が必要。
#import
※なぜか自動補完が効かない(?)
Twitter.h
ちなみに、Twitter.h は TWRequest.h と TWTweetComposeViewController.h を import します。
#import
#import
TWTweetComposeViewController
メールと同様に、Tweet も予め用意されたUI画面から投稿します。
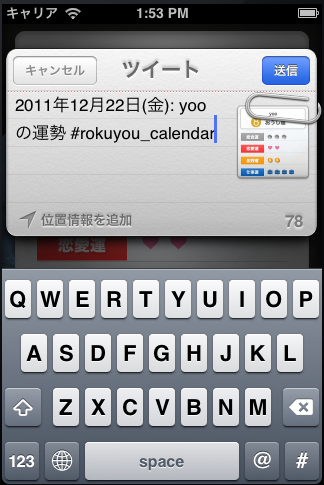
アカウントはiOS5 標準のTwitterアカウント設定を利用(正式には ACAccount)するので、初めて利用する場合は、TWTweetComposeViewController が生成されると自動的にナビゲートされます。 アプリ独自にアカウントを保存する実装が要らないので凄く便利。
利用できるメソッドもそれほど多くないです。
enum TWTweetComposeViewControllerResult {
    TWTweetComposeViewControllerResultCancelled,
    TWTweetComposeViewControllerResultDone
};
typedef enum TWTweetComposeViewControllerResult TWTweetComposeViewControllerResult;
typedef void (^TWTweetComposeViewControllerCompletionHandler)(TWTweetComposeViewControllerResult result);

UIKIT_CLASS_AVAILABLE(5_0) @interface TWTweetComposeViewController : UIViewController {
}

//Tweet が可能かどうか?
+ (BOOL)canSendTweet;

//初期のメッセージ
- (BOOL)setInitialText:(NSString *)text;

//添付画像追加
- (BOOL)addImage:(UIImage *)image;

//添付画像を全て削除
- (BOOL)removeAllImages;

//URLを追加
- (BOOL)addURL:(NSURL *)url;

//全てのURLを削除
- (BOOL)removeAllURLs;

//Tweet 完了後のハンドラー
@property (nonatomic, copy) TWTweetComposeViewControllerCompletionHandler completionHandler;
- (void)openTweet
{
    UIImage *image = [self captureScreen];

    TWTweetComposeViewController * composeViewController = [[TWTweetComposeViewController alloc] init];
    [composeViewController setInitialText:[self createComment]];
    [composeViewController addImage:image];
    [self presentModalViewController:composeViewController animated:YES];
}
completionHandlerを利用する
Tweet を投稿、キャンセル後のハンドラーを取得する事ができますが、completionHandler プロパティにblock文を記述します。 処理の種類はTWTweetComposeViewControllerResult 型で判別します。
    TWTweetComposeViewController * composeViewController = [[TWTweetComposeViewController alloc] init];
    [composeViewController setInitialText:@"デフォルトコメント"];

    composeViewController.completionHandler =
    ^(TWTweetComposeViewControllerResult result) {
        switch (result) {
            case TWTweetComposeViewControllerResultDone:
                NSLog(@"TWTweetComposeViewControllerResultDone");
                break;
            case TWTweetComposeViewControllerResultCancelled:
                NSLog(@"TWTweetComposeViewControllerResultCancelled");
                break;
            default:
                NSLog(@"other");
                break;
        }
        [self dismissModalViewControllerAnimated:YES];
    };
この際、dismissModalViewControllerAnimated: などで終了しておかないと、思わぬ挙動となるので注意が必要です。
TWRequest.h
TWTweetComposeViewController 予め用意されているコンポーネントですが、 Twitter API を直接利用するには TWRequest を使って、URL、パラメータを指定してリクエストします。
Use TWrequest to send an image with a text to Twitter in IOS5 を参考に画像とテキストを同時に投稿します。
まず、Twitter のメディア投稿 API URLは、Twitter Developer - POST statuses/update_with_media を参照
例えば、画像付きテキストの投稿 URL は
https://upload.twitter.com/1/statuses/update_with_media.json
TWRequest インスタンス生成時に NSURL、TWRequestMethod を指定します。 ※パラメータ(NSDictionary) は任意
TWRequestMethod は以下の3種類
    TWRequestMethodGET,
    TWRequestMethodPOST,
    TWRequestMethodDELETE
データ追加は 各オブジェクト をNSData 変換して addMultiPartData で TWRequest に追加します。
そして最後の送信処理は、performRequestWithHandler でリクエストしますが、これが少々癖があります。 非同期処理なので、Twitter Developer では block 文で記述するのが推奨(と言うかこれしかできない?)されています。
アカウント取得
アカウントを取得したい場合は、ACAccountStore で取得可能ですが、複数アカウントが設定できるため、返り値は NSArray です。 ACAccountStore を利用するには、Accounts.framework の読み込みが必要です。
- (NSArray *)fetchAccounts
{
    ACAccountStore *accountStore = [[ACAccountStore alloc] init];
    ACAccountType *accountType = [accountStore accountTypeWithAccountTypeIdentifier:ACAccountTypeIdentifierTwitter];

    NSArray *accounts = [NSArray array];
    [accountStore requestAccessToAccountsWithType:accountType withCompletionHandler:
     ^(BOOL granted, NSError *error) {
        if (granted) {
            _accounts = [accountStore accountsWithAccountType:accountType];
        }
    }];
    return accounts;
}
これも気になるのが、withCompletionHandler でしょうか? アカウント取得後の処理も非同期処理なので、それを考慮しないといけません。
ACAccount
ACAccountStore で利用できるプロパティは、以下の通り。
- (id)initWithAccountType:(ACAccountType *)type;
@property (nonatomic, readonly) NSString            *identifier;
@property (nonatomic, retain)   ACAccountType       *accountType;
@property (nonatomic, copy)     NSString            *accountDescription;
@property (nonatomic, copy)     NSString            *username;
@property (nonatomic, retain)   ACAccountCredential *credential;
Identifier は読み込み専用。 ACAccountType の各プロパティは読み込み専用の為、事実上 ACAccountTypeIdentifierTwitter しか利用できないかと思います。 ACAccountCredential は、現時点で OAuthToken の情報を保持します。
以上を踏まえて、投稿とタイムラインの取得をしてみます。 アカウントは、最初のアカウントを取得しているのでちょっと手抜きです。
テキストと画像を投稿
- (void)requestTweet:(NSString *)message :(UIImage *)image
{
    ACAccountStore *store = [[ACAccountStore alloc] init];
    ACAccountType *twitterAccountType = [store accountTypeWithAccountTypeIdentifier:ACAccountTypeIdentifierTwitter];

    [store requestAccessToAccountsWithType:twitterAccountType
                     withCompletionHandler:^(BOOL granted, NSError *error) {
                         if (!granted) {

                         } else {
                             NSArray *twitterAccounts = [store accountsWithAccountType:twitterAccountType];

                             if ([twitterAccounts count] > 0) {
                                 NSURL *url =
                                 [NSURL URLWithString:
                                  @"https://upload.twitter.com/1/statuses/update_with_media.json"];

                                 TWRequest *request = [[TWRequest alloc] initWithURL:url parameters:nil
                                                  requestMethod:TWRequestMethodPOST];
                                 [request setAccount:[twitterAccounts objectAtIndex:0]];

                                 if (image != nil) {
                                     NSData *imageData = UIImagePNGRepresentation(image);
                                     [request addMultiPartData:imageData
                                                      withName:@"media[]" type:@"multipart/form-data"];
                                 }

                                 NSString *status = message;
                                 [request addMultiPartData:[status dataUsingEncoding:NSUTF8StringEncoding]
                                                  withName:@"status" type:@"multipart/form-data"];

                                 [request performRequestWithHandler:
                                  ^(NSData *responseData, NSHTTPURLResponse *urlResponse, NSError *error) {
                                      NSDictionary *dict =
                                      (NSDictionary *)[NSJSONSerialization
                                                       JSONObjectWithData:responseData options:0 error:nil];

                                      NSLog(@"%@", dict);

                                      dispatch_async(dispatch_get_main_queue(), ^{

                                      });
                                  }];
                             }
                         }
                     }];


}
Home Timeline を取得
ACAccountStore *store = [[ACAccountStore alloc] init];
    ACAccountType *twitterAccountType = [store accountTypeWithAccountTypeIdentifier:ACAccountTypeIdentifierTwitter];

    [store requestAccessToAccountsWithType:twitterAccountType
                     withCompletionHandler:^(BOOL granted, NSError *error) {
                         if (!granted) {

                         } else {
                             NSArray *twitterAccounts = [store accountsWithAccountType:twitterAccountType];

                             if ([twitterAccounts count] > 0) {
                                 ACAccount *account = [twitterAccounts objectAtIndex:0];

                                 NSMutableDictionary *params = [[NSMutableDictionary alloc] init];
                                 [params setObject:@"1" forKey:@"include_entities"];

                                 NSURL *url = [NSURL URLWithString:@"http://api.twitter.com/1/statuses/home_timeline.json"];

                                 TWRequest *request =
                                 [[TWRequest alloc]
                                  initWithURL:url parameters:params requestMethod:TWRequestMethodGET];

                                 [request setAccount:account];
                                 [request performRequestWithHandler:
                                  ^(NSData *responseData, NSHTTPURLResponse *urlResponse, NSError *error) {
                                      if (error != nil) {
                                          NSLog(@"%@", error);
                                      } else {
                                          NSError *jsonError;
                                          NSArray *timeline =
                                          [NSJSONSerialization
                                           JSONObjectWithData:responseData
                                           options:NSJSONReadingMutableLeaves
                                           error:&jsonError];
                                          if (jsonError == nil) {
                                              NSLog(@"%@", timeline);
                                          } else {

                                              NSLog(@"%@", jsonError);
                                          }
                                      }
                                  }];
                             }
                         }
                     }];
これで Twitter アプリは一通りできるのではないでしょうか?
http://d.hatena.ne.jp/mmasashi/20110923/1316763979
http://news.mynavi.jp/column/iphone/041/index.html
16進数の設定方法が、UIColor には実装されていない(?)ようなので、カスタムで作る必要があります。 例えば、FF0000AA(RGBA)を UIColor に変更するには、 (1) 文字列をカラーとアルファに分割 (2) 各文字列の16進数表示を、NSScanner を利用して int に変更する (3) int 値を、R, G, B, A それぞれに小数に変換(255.0f で割る)する (4) UIColor を作成する
16 進数の文字列 (NSString) を数値型 (int) に変換する を参考にしました。
サンプル
-(UIColor*) hexToUIColor:(NSString *)hex
{
    NSRange colorRange = NSMakeRange(0, 6);
    NSRange alphaRange = NSMakeRange(6, 2);
    NSString *colorString = [hex substringWithRange:colorRange];
    NSString *alphaString = [hex substringWithRange:alphaRange];

    NSScanner *colorScanner = [NSScanner scannerWithString:colorString];
    NSScanner *alphaScanner = [NSScanner scannerWithString:alphaString];

    unsigned int color;
    unsigned int alpha;
    [colorScanner scanHexInt:&color];
    [alphaScanner scanHexInt:&alpha];

    CGFloat r = ((color & 0xFF0000) >> 16)/255.0f;
    CGFloat g = ((color & 0x00FF00) >> 8) /255.0f;
    CGFloat b =  (color & 0x0000FF) /255.0f;
    CGFloat a = alpha /255.0f;

    return [UIColor colorWithRed:r green:g blue:b alpha:a];
}
わざわざ文字列分割しなくても、0xFF000000 >> 24 みたくしても良いかとは思いますが。
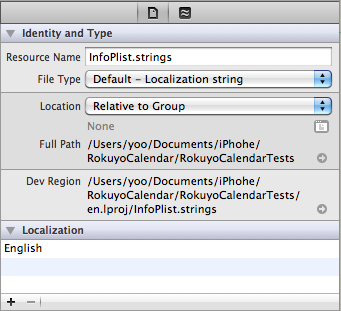
Xcode3系 では、 Localizable.strings の右クリックでローカライズをしていたが、基本的に右クリック設定ができなくなったXcode4系では、File Inspector での設定に変更になりました。
以前、間違えて infoPlist.strings の設定をしていましたが、正しくは Localizable.strings でした。
設定方法
InfoPlist.strings を選択
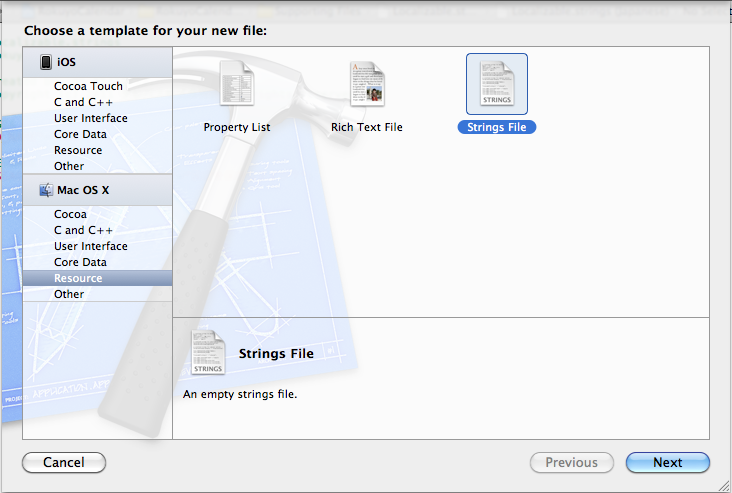
Localizable.strings の作成
Localizable.strings ファイルを新規作成する。
(デフォルトプロジェクトで作成されていない?)
Localizable.strings を選択し、Identify and Type を開く。
【+】ボタンで、言語を追加する。

InfoPlist.strings に言語が追加される
Localizable.string に対称言語の strings ファイルが追加される。
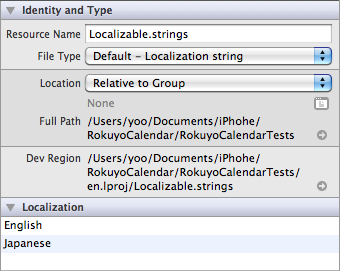
あとは、従来通りにローカライズの設定をしていくだけです。