 アプリからメール送信
2011/01/13
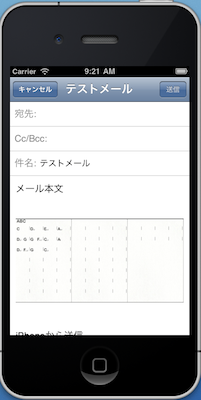
メール送信処理は、よっぽどの事がない限りMFMailComposeViewControllerが便利かと思おう。 自らコンポーネントを作らずしてメール送信フォームの表示から送信までやってくれる。
誇張とかじゃなくて、本当に3分クッキングでできてしまいます。

MFMailComposeViewControllerの準備
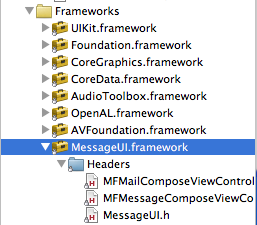
MFMailComposeViewControllerを利用するには、MessageUI.frameworkを追加する必要がある。
 そして、MessageUIを読み込んでMFMailComposeViewControllerDelegateを追加
#import
...
@interface MailViewController : UIViewController  {
...
送信前の処理
- (void)pageMailForm {
    MFMailComposeViewController *picker = [[MFMailComposeViewController alloc] init];
    picker.mailComposeDelegate = self;
    [picker setSubject:@"テストタイトル"];
    [picker setMessageBody:@"メール本文" isHTML:NO];

    //Documentsディレクトリのsample.jpgを添付する
    NSArray *paths = NSSearchPathForDirectoriesInDomains(NSDocumentDirectory,  NSUserDomainMask, YES);
    NSString *basePath = [paths objectAtIndex:0];
    NSString *fileName = [NSString stringWithFormat:@"sample.jpg", song.name];
    NSString *filePath = [basePath stringByAppendingPathComponent:fileName];
    NSData* fileData = [NSData dataWithContentsOfFile:filePath];
    [picker addAttachmentData:fileData mimeType:@"image/jpg" fileName:fileName];

    [self presentModalViewController:picker animated:YES];
    [picker release];
}
送信後の処理
送信ボタンをクリックすると呼ばれるDelegateメソッド。 結果判別やエラー処理で使います。
- (void)mailComposeController:(MFMailComposeViewController*)controller
          didFinishWithResult:(MFMailComposeResult)result error:(NSError*)error {
    switch (result) {
        case MFMailComposeResultSent:
            //送信完了
            break;
        case MFMailComposeResultSaved:
            //下書き保存
            break;
        case MFMailComposeResultCancelled:
            //キャンセル
            break;
        case MFMailComposeResultFailed:
            //失敗
            break;
    }
    [self dismissModalViewControllerAnimated:YES];
}
これを元にサブクラスを作ってやれば、もっと幸せになれそうですね。